The process to reset the vRealize Log Insight (vRLI) Admin password has been changed in vRLI 4.7 and above with the introduction of Cassandra authentication. This means if you need to reset the local admin password, the previously documented methods no longer work.
In order to reset the admin password you will need to connect to all of the vRLI nodes using the root account. Please follow the steps below
1. Download the li-reset-admin-passwd.sh script from HERE
2. Copy li-reset-admin-passwd.sh to the following location on each node using Secure Copy (WinSCP in Windows) and overwrite the existing li-reset-admin-passwd.sh
/opt/vmware/bin
3. Log into the vRealize Log Insight Master node as root via SSH or Console.
4. Run the following command to set permissions on the script:
This post was written by Cameron Fore and is being reproduced here just for posterity purposes for a future implementation. Original link HERE
vROps for Horizon provides end-to-end visibility into key User session statistics that make it easy for Horizon admins to visualise and alert on performance problems impacting the user’s of their environment. One of the key metrics used in determining how well user’s are connected to their virtual app or desktop session is Session Latency (ms), as it most visually impacts the user’s perspective of their session performance. The lower the session latency, the quicker video, keyboard, and mouse inputs are redirected to and from a user’s endpoint client, giving the user a more native-like PC experience.
As the latency trends higher (>180ms), the experience begins to
degrade, and the user can begin to notice “sluggishness“ – slow keyboard,
mouse, and video responsiveness.
vROps for Horizon gives us direct visibility into when these issues are occurring across all of the Active User Sessions of the Horizon View environment. However, once the session becomes inactive, it will go into a stale object state and be removed from vROps during a clean-up window.
To be able to view this information historically on Pools and User
objects, you can create Super Metrics that simply maps the session latency to
the objects you want to report on.
Creating the Super Metric
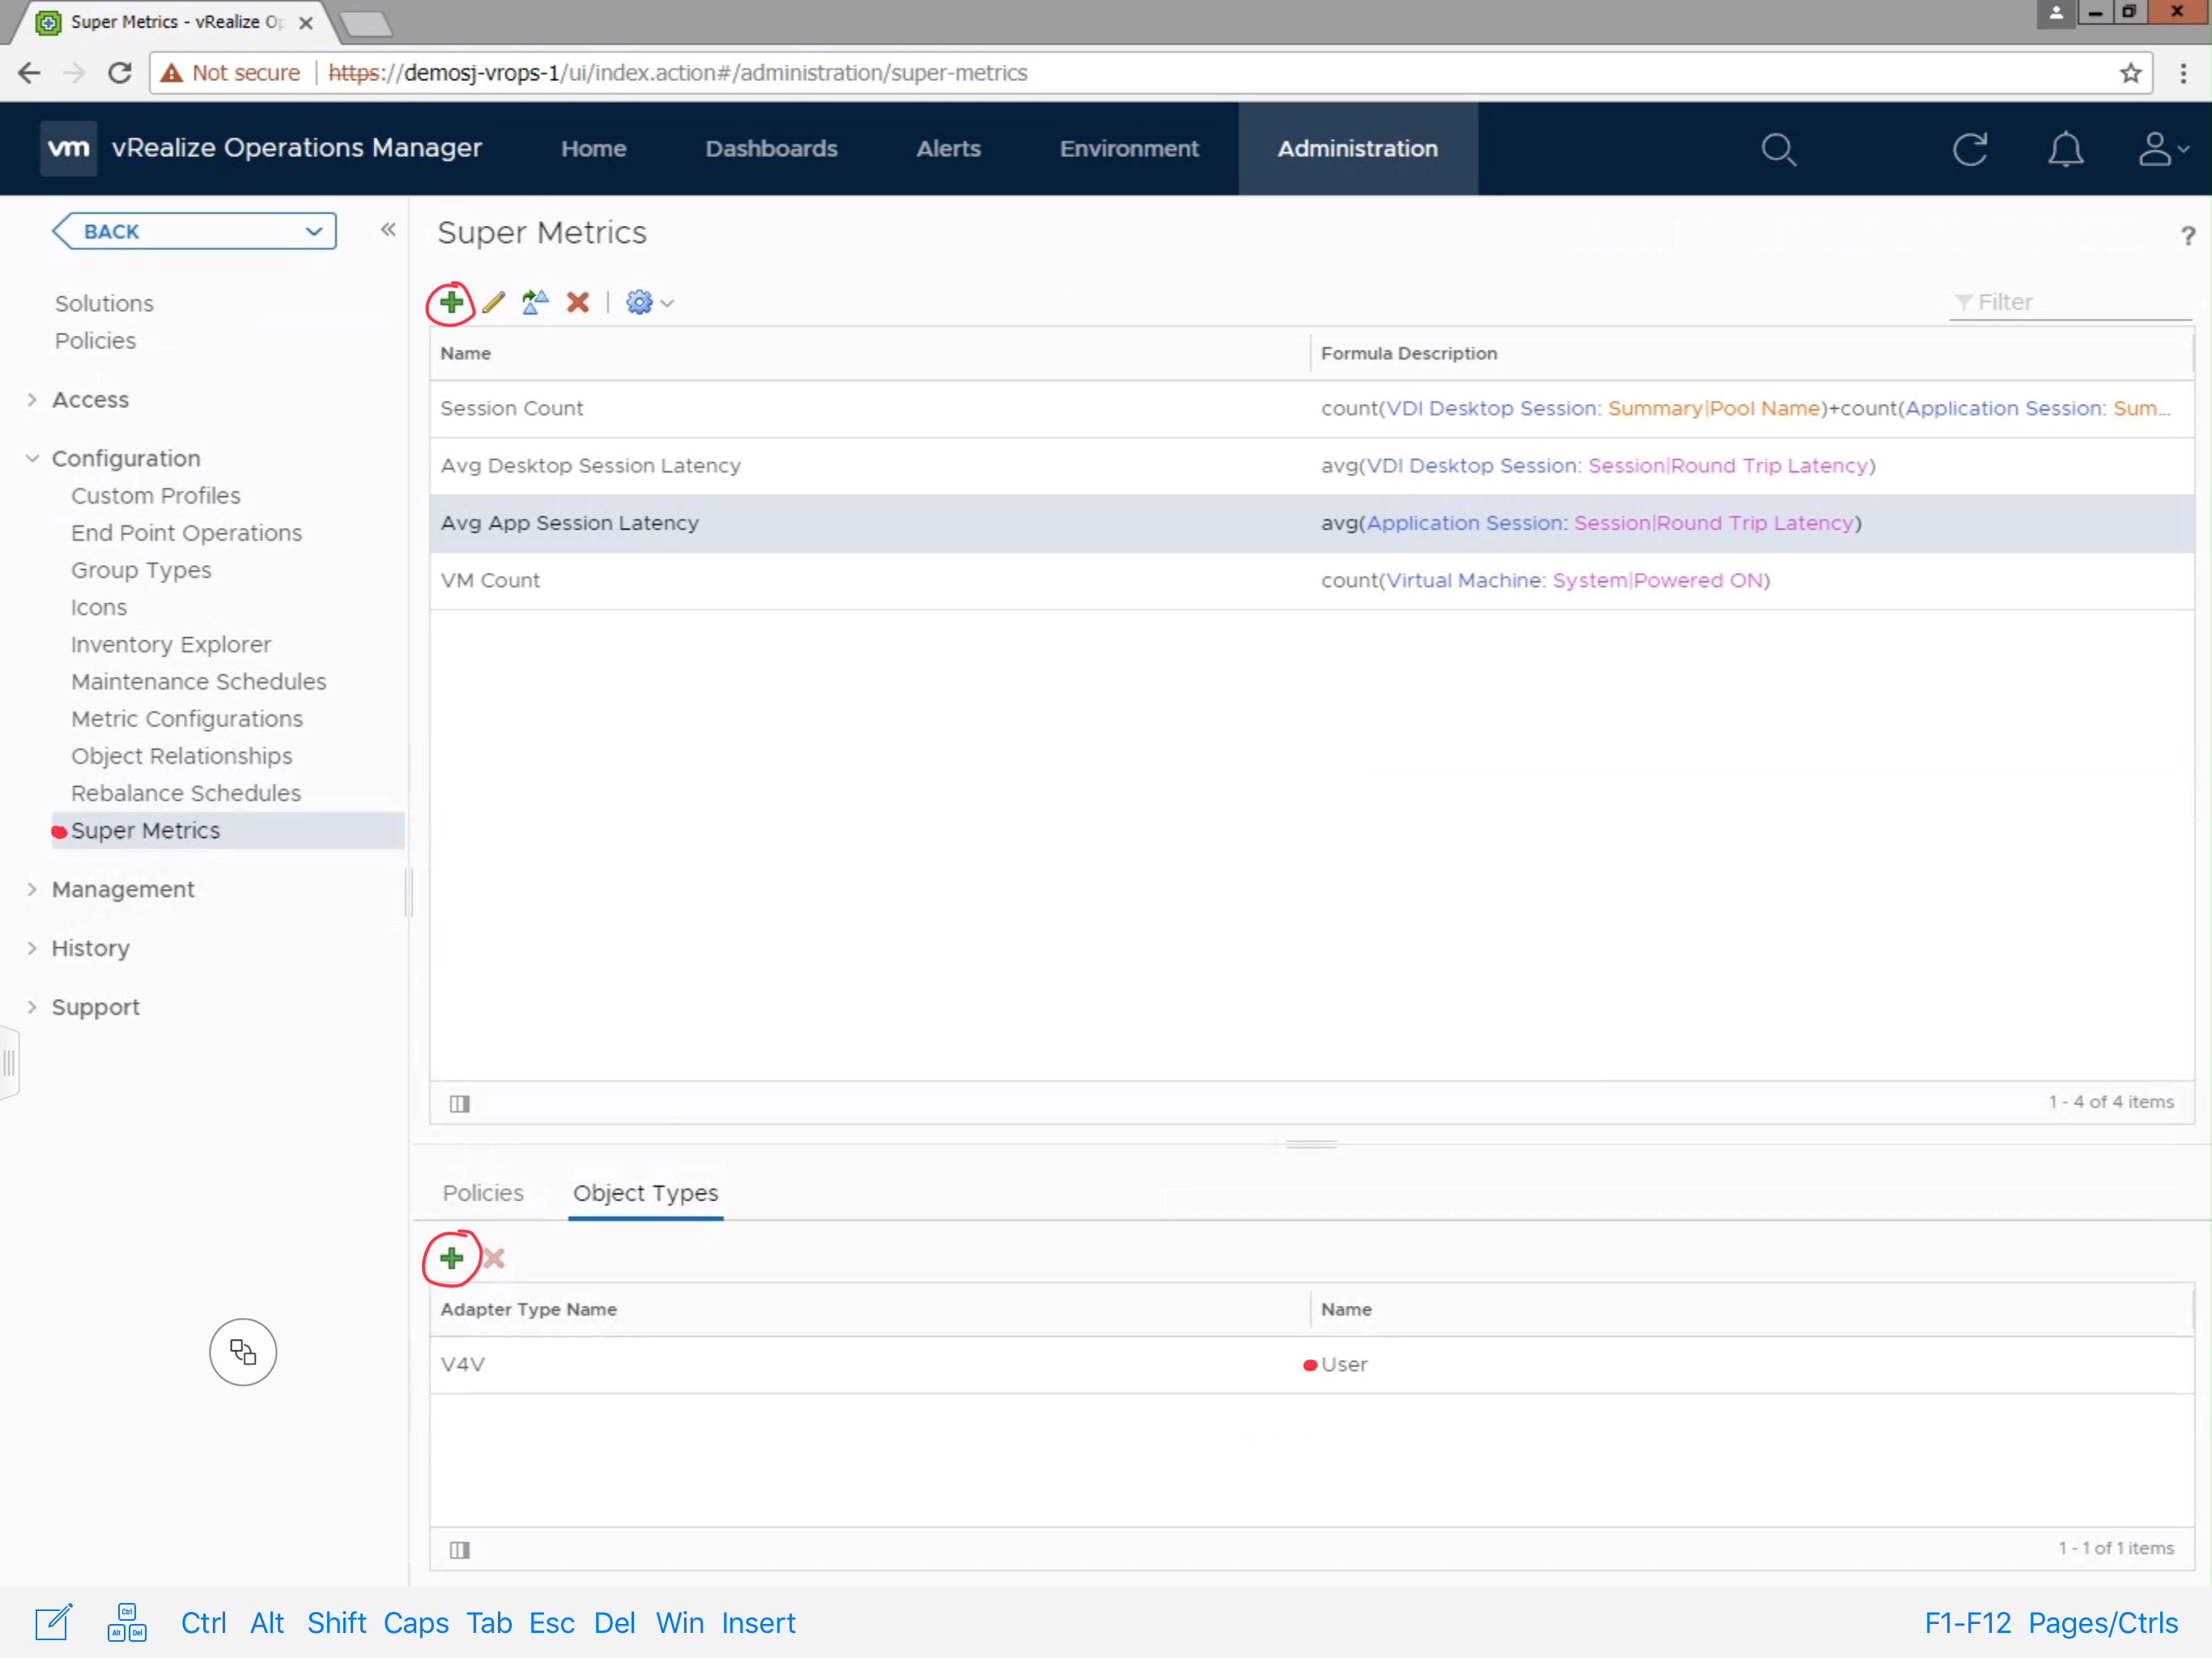
To create the Super Metric, Navigate to Administration ->
Configuration -> Super Metrics. Click the green + sign to create a new
Super Metric.
Provide the Super Metric a unique name, in this case we are using “Avg
App Session Latency”. Search for the “Application Session” Object
Type, and click “Round Trip Latency (ms)” to add it to the Super Metric.
Since, we are looking for the average latency, select “avg” from the
available functions list, making sure that the average function applies to the
metric by encapsulating it parenthesis as demonstrated in the image below.
Click Save to finish the Super Metric.
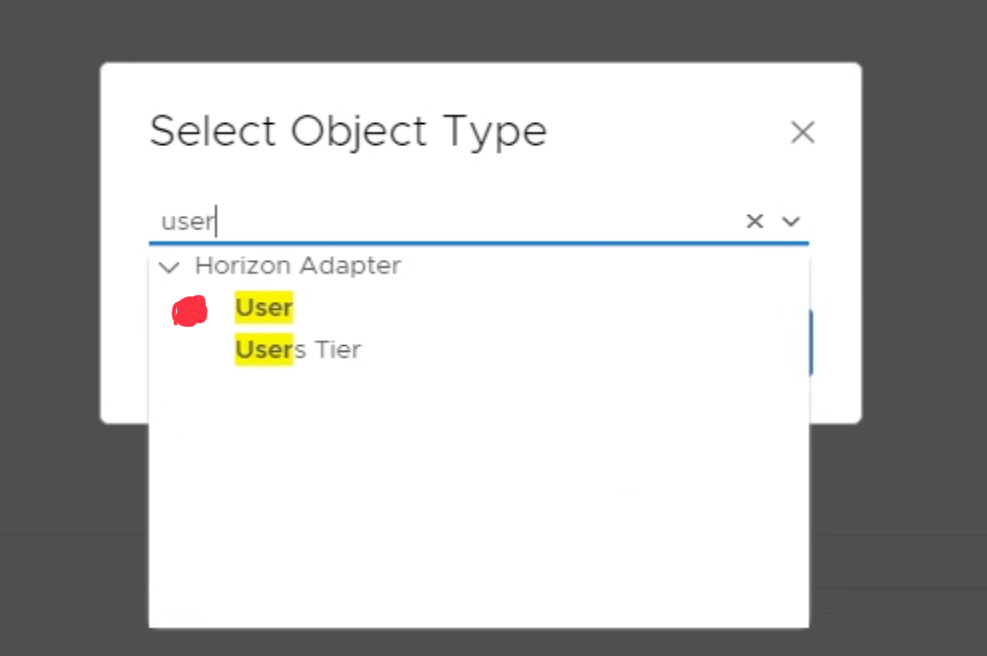
Next, you will need to add the Super Metric to the “User” object type.
Click the green + sign under the “Object Types” section. Search and
select the “User” object type.
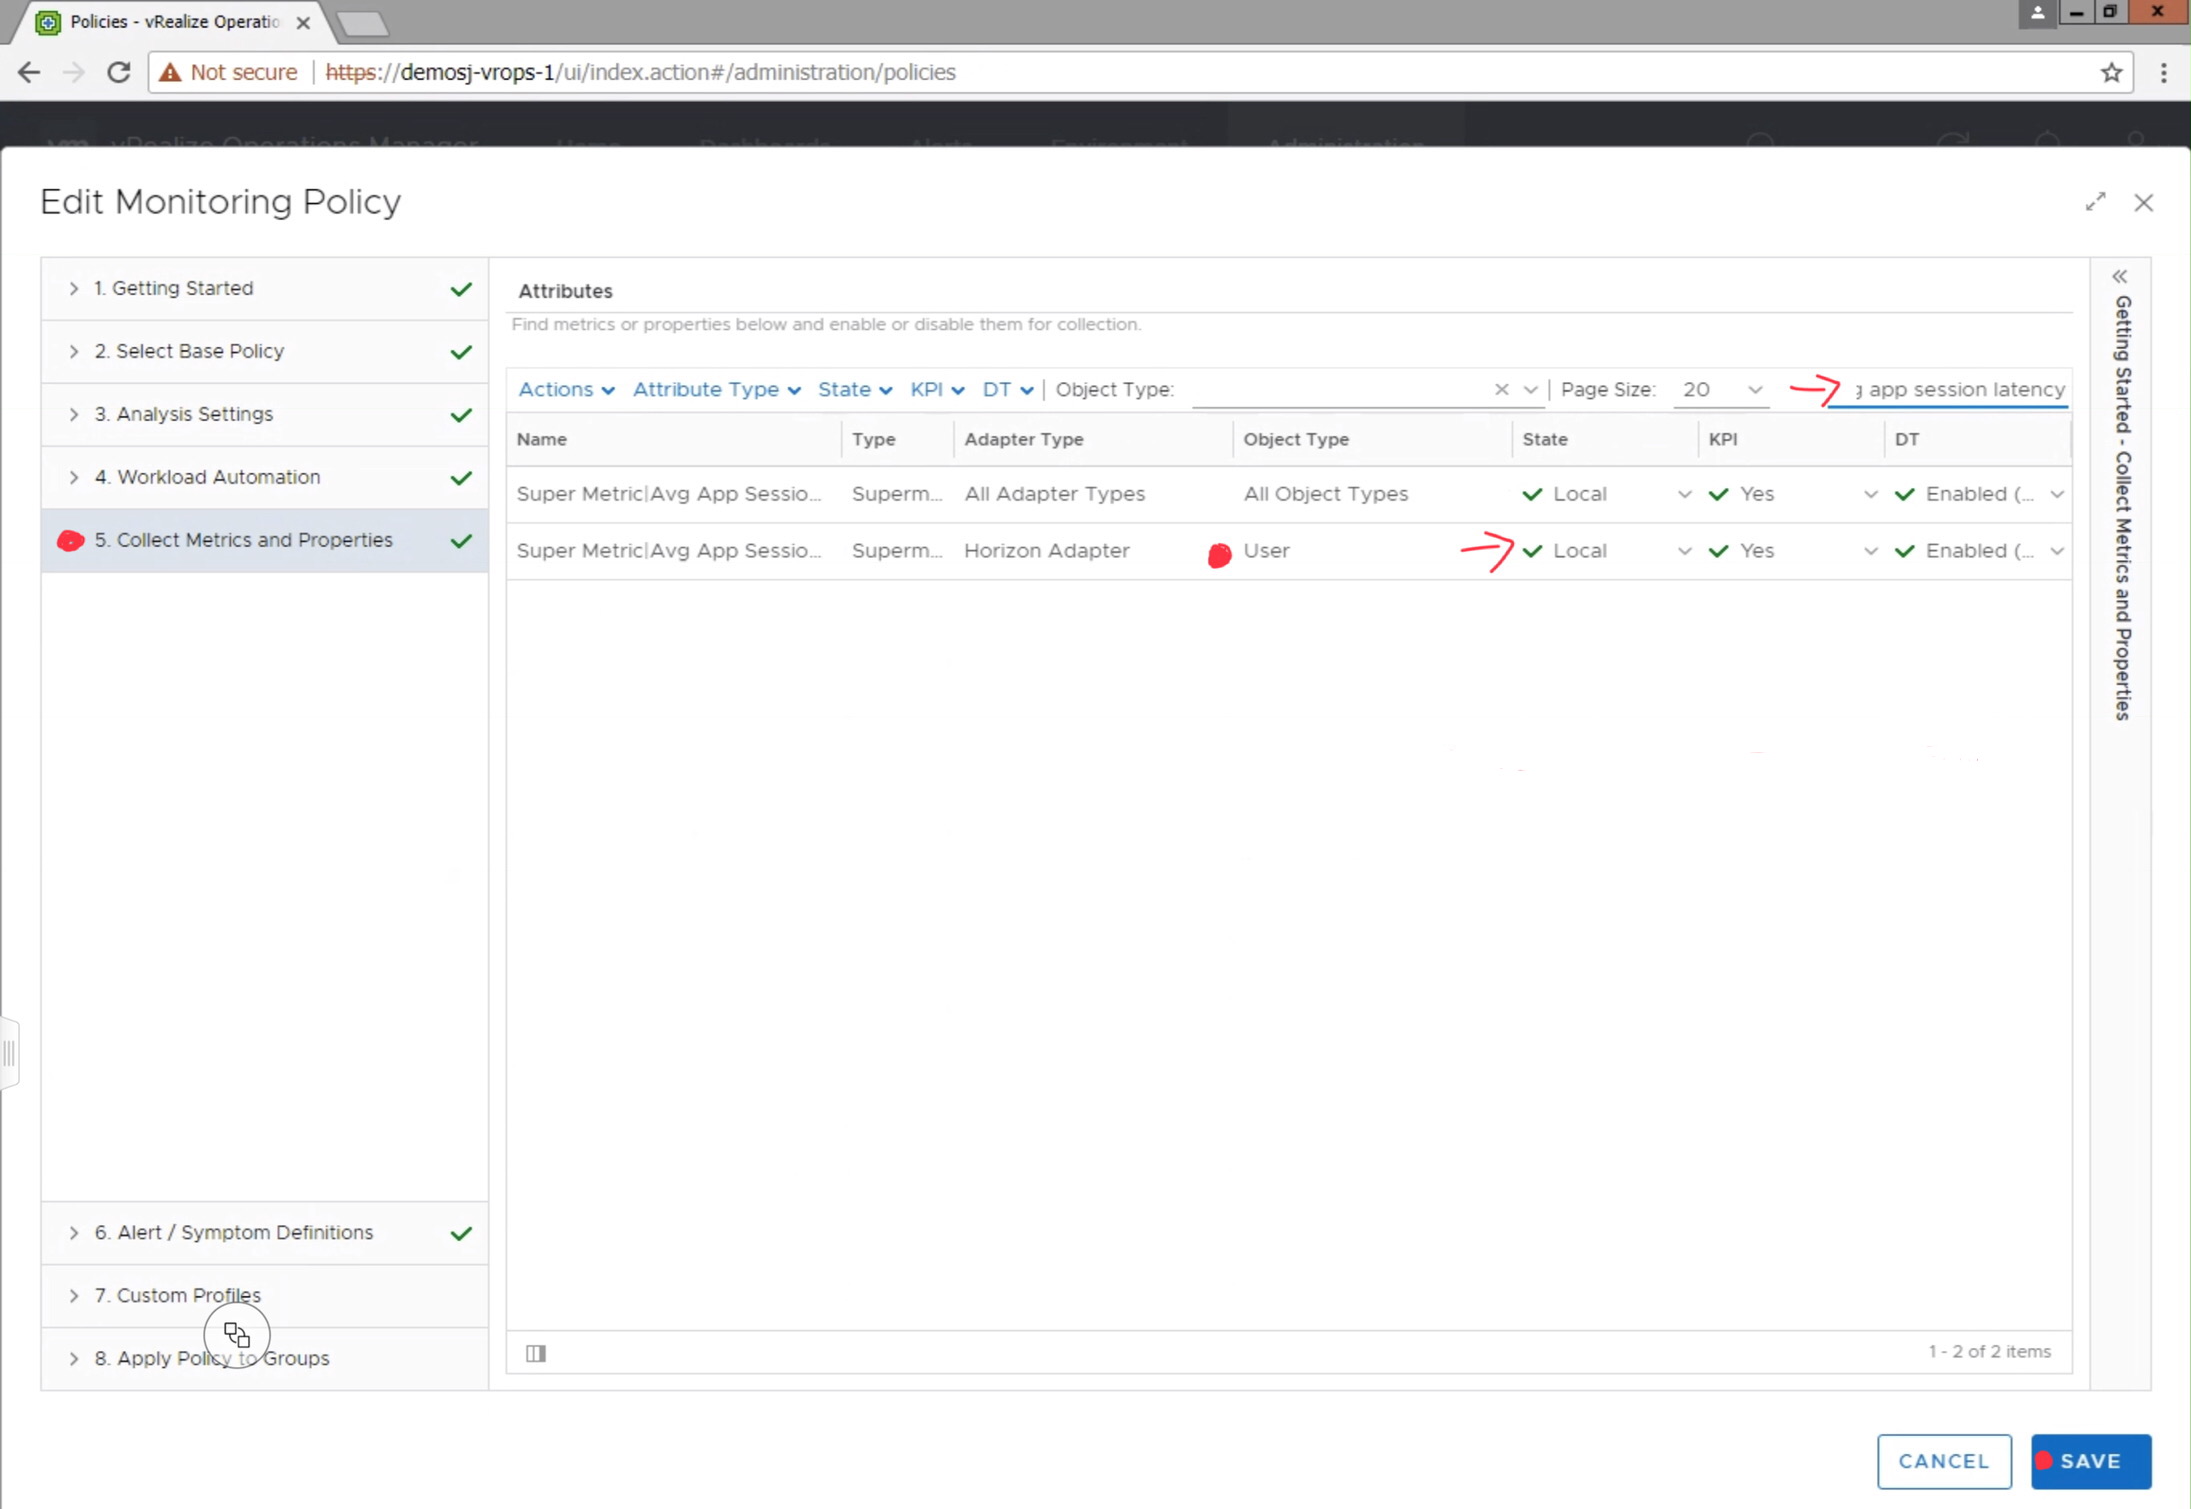
Before the Super Metric will begin collecting data, you will need to
navigate to Administration-> Policies, and edit the active monitoring policy
to enable the metric for collection.
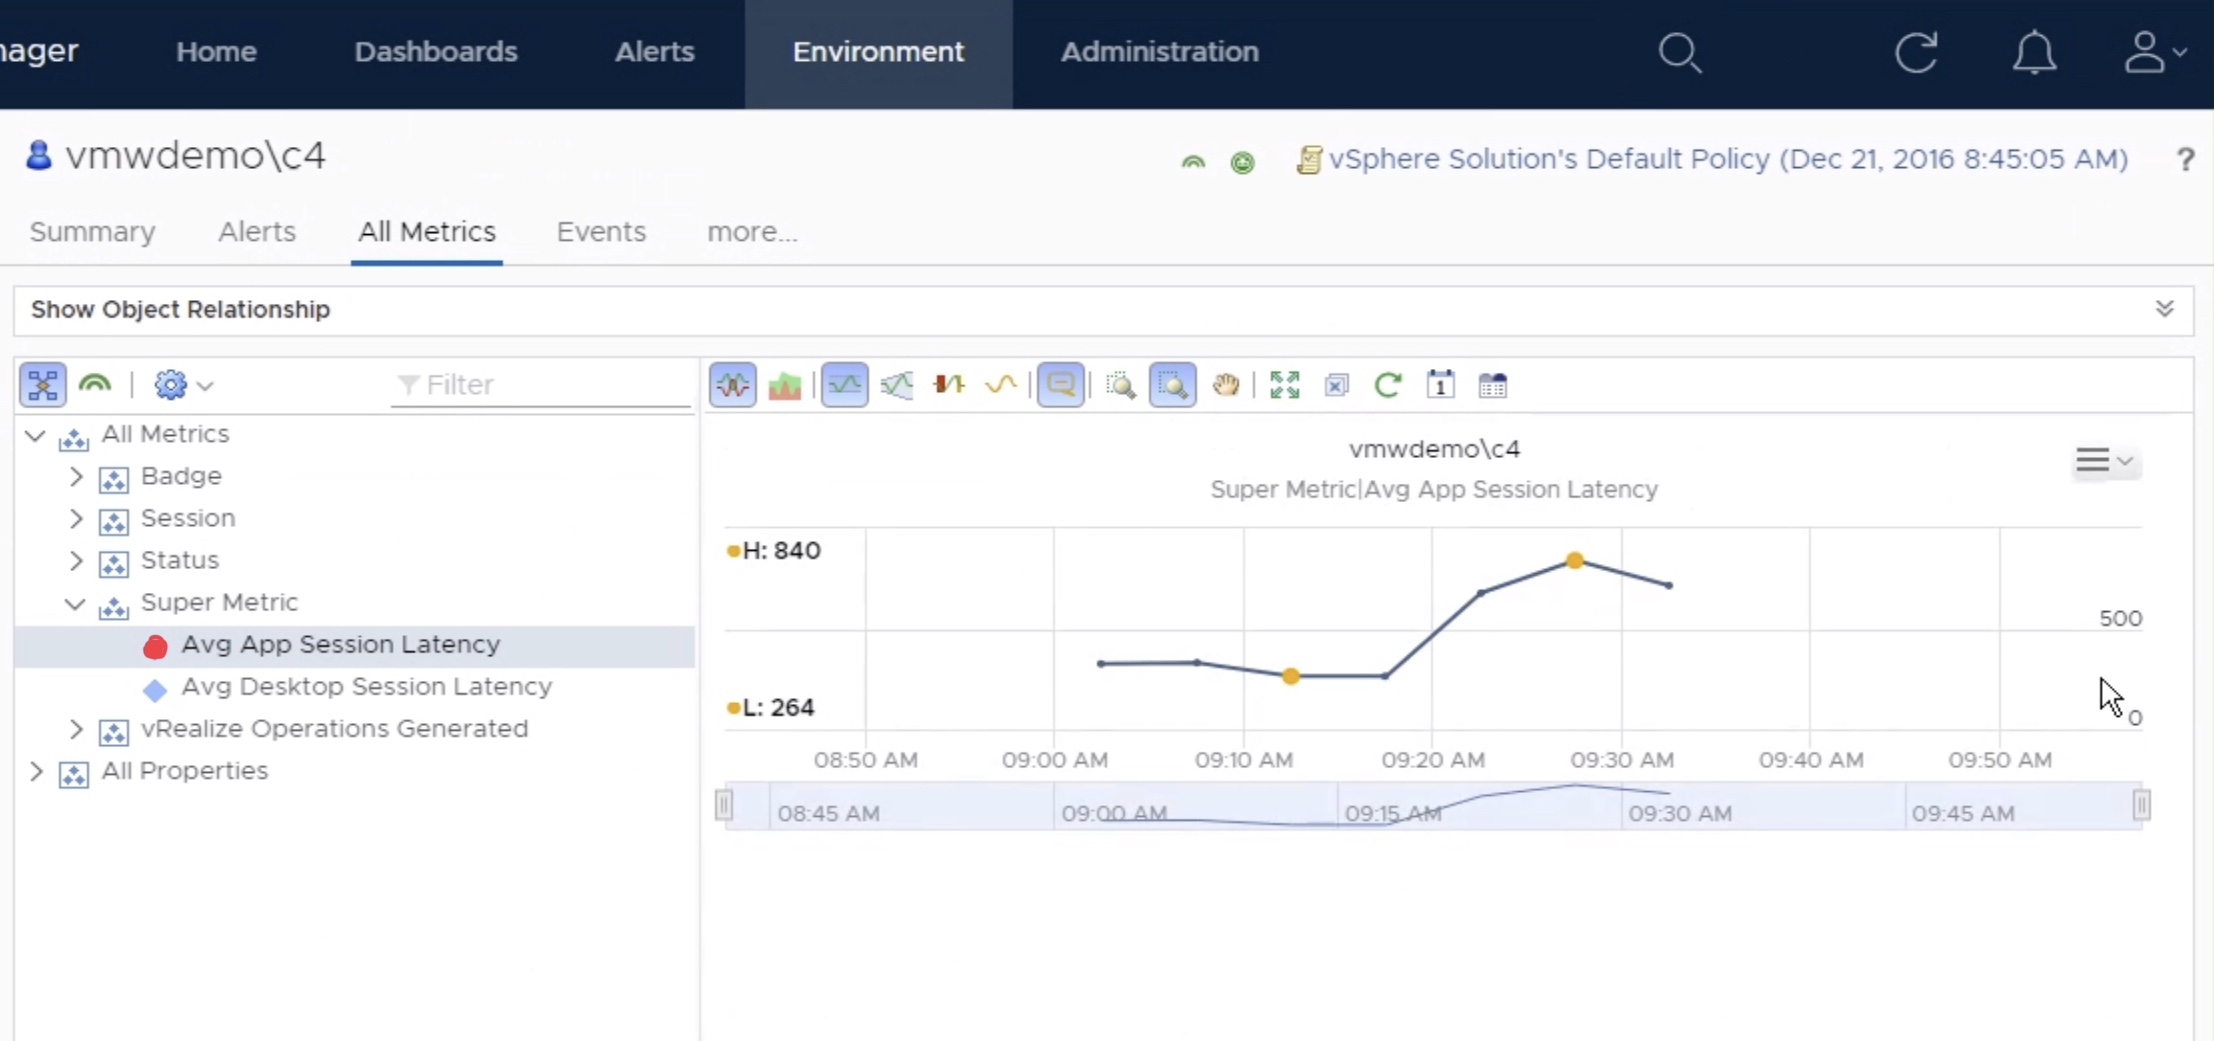
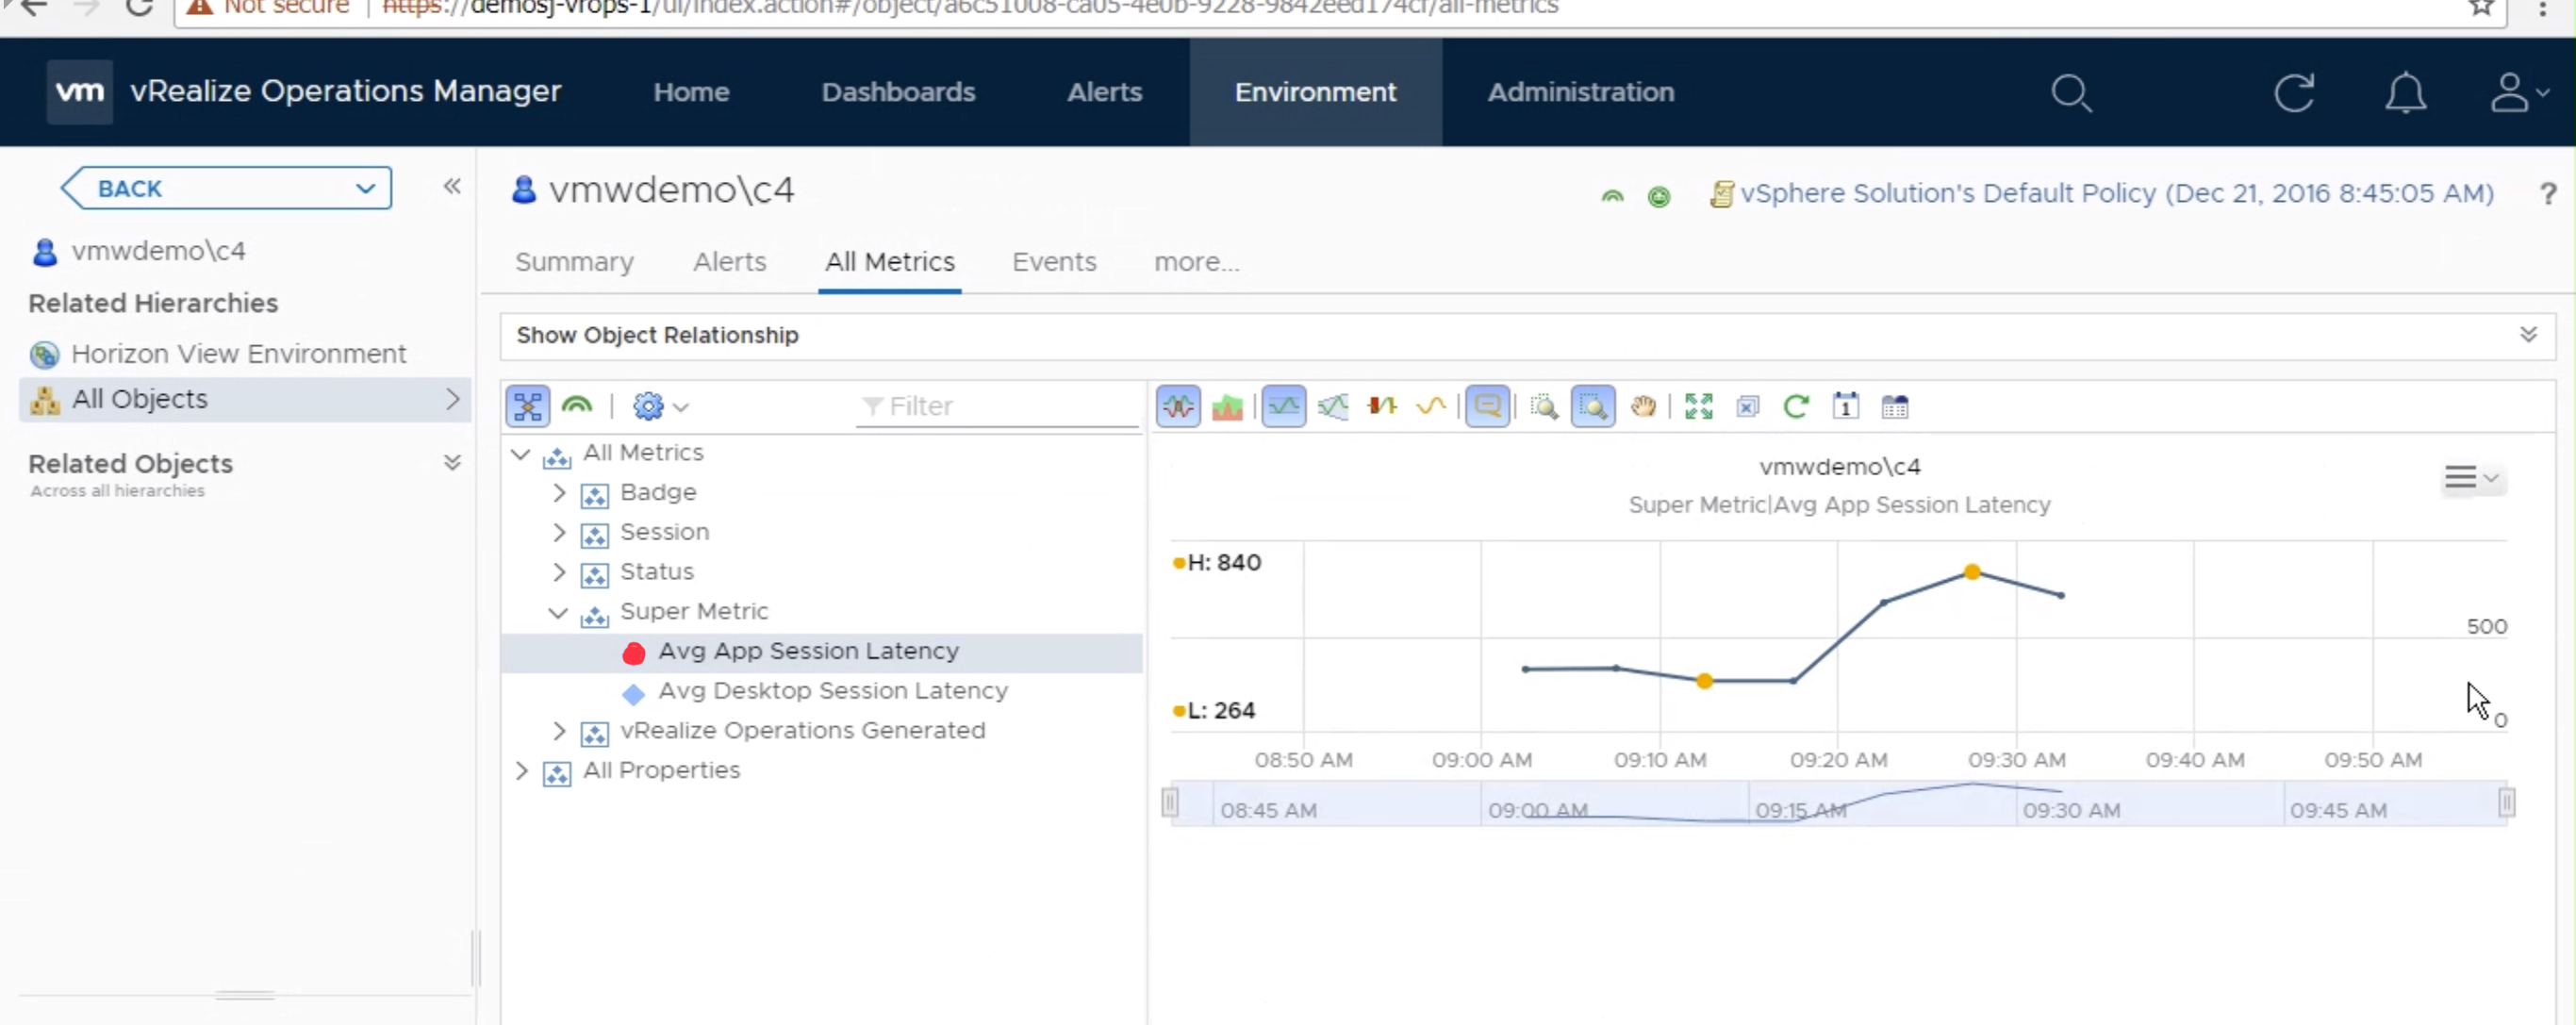
Once the metric has started to collect data, you can view the data on a
individual “User” object by selecting “All Metrics” -> Super Metric ->
select metric.
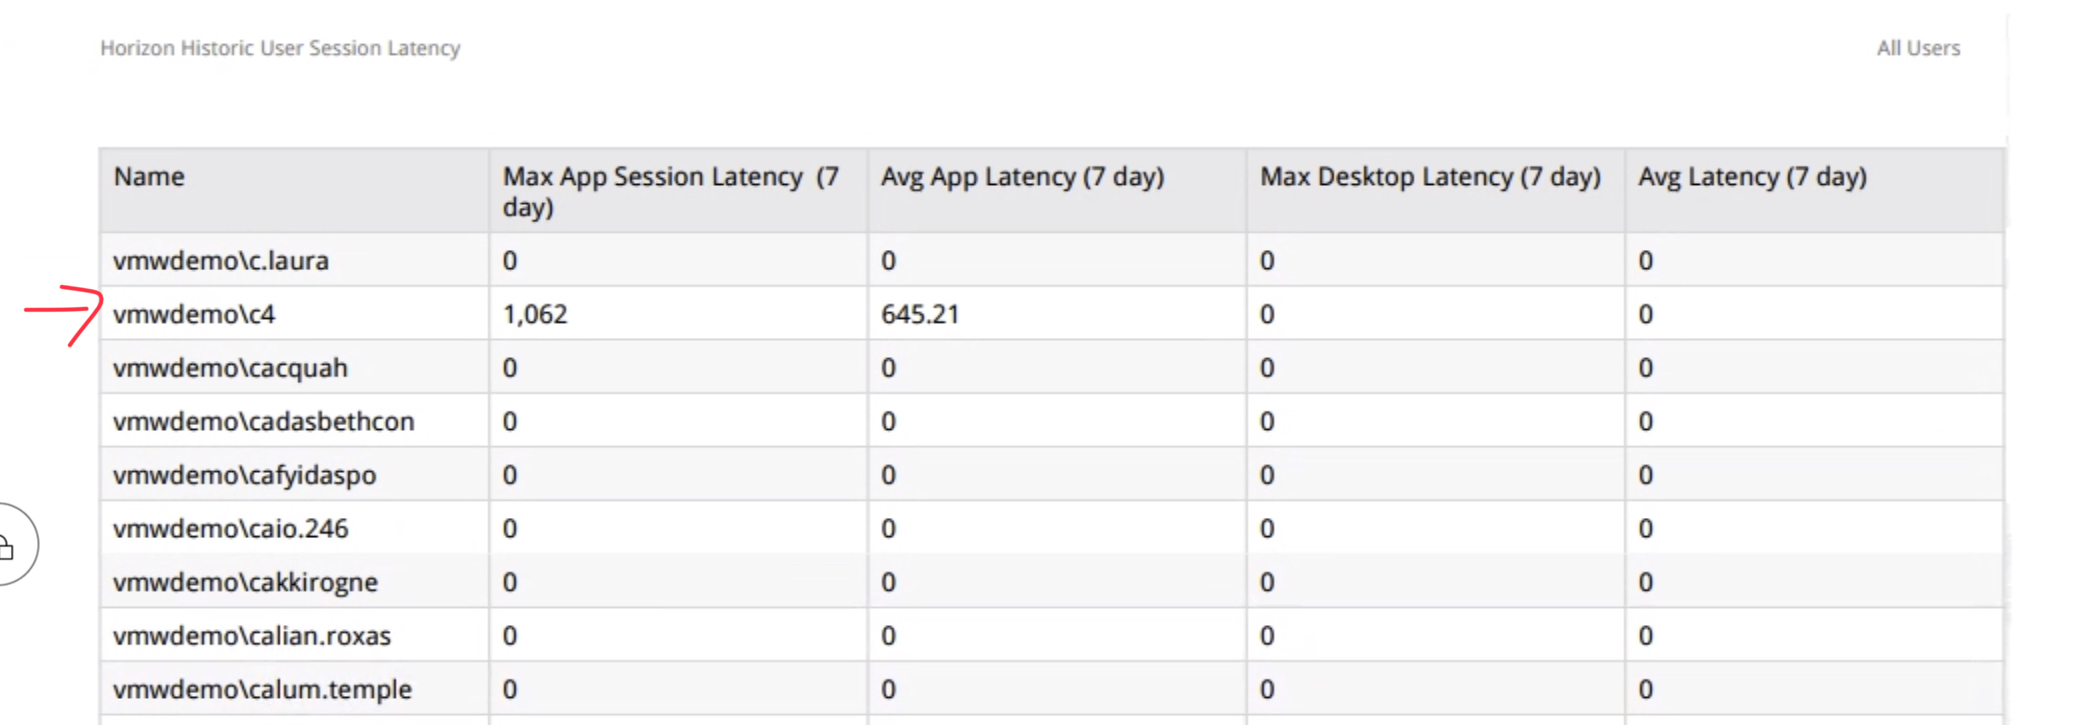
You can also create custom Views that display the historical latency for all users of the environment, as well as perform simple roll-up statistics.
I was recently asked about the Log Insight Agent buffer by a client who wasn’t sure what it was, how it works and how to configure it.
The buffer is used to locally store events and vRLI Agent logs when the vRLI cluster is unreachable.
By default it is set to a maximum of 200MB. When the specified max_disk_buffer is reached, the agent begins to drop new incoming events.
The buffer size is defined in the agent configuration file either locally on each agent by altering the liagent.ini file or centrally using an agent group on the vRLI Administration UI.
Insert the following above the system log definition section to set the buffer to 2GB
[storage]
max_disk_buffer=2000
Prior to Agent 4.6 the maximum level was 2000 MB
From Agent 4.6 the maximum has been increased from 2GB to 8GB
Have you had the misfortune of receiving the error message “Failure: Error while running package installation” “Update failed, revert to snapshot and try again” whilst running an upgrade of your vIDM appliances? You aren’t alone, I’ve come across this multiple times in different environments.
This error potentially indicates that the appliance has exhausted all the inodes available, and consumed all disk space
If you check the log Updatecli.log might see the message of no space error in location /var/ .
You can check inode disk space using command
df -i
From here you will have to delete some files in the /var mount to clean up inode disk space.
Here are steps to clean inode disk space
1.Execute below command to check ,which folder under /var/ is having high number of files.
for i in /var/*; do echo $i; find $i |wc -l; done
2. if /var/spool/clientmqueue occupies large space. Please execute below command to delete files in /var/spool/clientmqueue
cd /var/spool/clientmqueue
echo * | xargs -n 100 rm
3. To delete /var/log files .Execute below command .This deletes anything ending with extension bz2 in location /var/log that is older than 60 days
cd /var/log
find ./*.bz2 -mtime +60 -exec rm {} \;
4. Run “df -i” again so see if /var shows sufficient space
5. Enable update debug mode by creating a file called rpm.debug in the flags folder in order to see verbose logs for the update.
cd /usr/local/horizon/conf/flags
touch rpm.debug
6. Perform upgrade again
Tomcat.pid
If during the upgrade you get the following message
"/opt/vmware/horizon/workspace/logs/tomcat.pid" was not found
This is due to the tomcat service not running. Please start the service using the command
service horizon-workspace start
Some additional ways to get more inode information:
Using “du”:
du --inodes -S | sort -rh | sed -n \'1,50{/^.\{71\}/s/^\(.\{30\}\).*\(.\{37\}\)$/\1...\2/;p}'
Using “ls” *
ls ~/test -AiR1U |
sed -rn '/^[./]/{h;n;};G;
    s|^ *([0-9][0-9]*)[^0-9][^/]*([~./].*):|\1:\2|p' |
sort -t : -uk1.1,1n |
cut -d: -f2 | sort -V |
uniq -c |sort -rn | head -n10
* If you’re curious, the heart-and-soul of that tedious bit of regex there is replacing the filename in each of ls's recursive search results with the directory name in which it was found. From there it’s just a matter of squeezing repeated inode numbers then counting repeated directory names and sorting accordingly.
The -U option is especially helpful with the sorting in that it specifically does not sort, and instead presents the directory list in original order – or, in other words, by inode number.
And of course -1 is incredibly helpful in that it ensures a single result per line, regardless of possibly included newlines in filenames or other spectacularly unfortunate problems that might occur when you attempt to parse a list.
And of course -A for all and -i for inode and -R for recursive and that’s the long and short of it.
If you get the “there was a problem with analytics service” error in the Health status post upgrade it usually means there is an issue with ElasticSearch, and usually due to unassigned shards.
First step is the usual turn it off and on again just to make sure. Shutdown the whole cluster leaving the master until last and then startup with master first.
2. Run the following command to determine if you have unassigned shards.
curl http://localhost:9200/_cluster/health?pretty
2. Run the following command to view the unassigned shards.
I had a customer with a very large legacy estate of very large VMs with RDMs attached, both physical and virtual. We were implementing vRealize Operations (vROps) and the customer wished for a way to automatically categorise and discover all VMs which had an RDM attached to them in the vROps dashboards and reports.
There are many ways to attempt to do this but it was decided that the simplest was to create a PowerCLI script to add a vCenter Custom Attribute to all VMs with an RDM attached. This Custom Attribute will automatically show as a property in vROps against the VM object, allowing for a new Custom Group to be created for VMs with and without RDMs. As vROps custom groups can be set for dynamic membership, the groups can be kept up to date without further configuration within vROps.
This script is designed to be run on a regular basis in order to account for new machines being added.
#load VMware PowerCLI module
if ((Get-PSSnapin | where {$_.Name -ilike "VMware.VimAutomation.Core"}).Name -ine "VMware.VimAutomation.Core"){
	Write-Host "Loading VMware PowerCLI"
	Add-PSSnapin VMware.VimAutomation.Core -ErrorAction SilentlyContinue
}

#Disconnect from any active vCenter sessions
If ($global:DefaultVIServers) {
    Disconnect-VIServer -Server $global:DefaultVIServers -Confirm:$false -Force:$true
    }

#define variables
$VMwithRDM=@()

#Retrieve Local Hostname
$LocalvCenter=[System.Net.Dns]::GetHostByName((hostname)).HostName

#Connect to servers

Write-Host "Connecting to Local vCenter"
Connect-VIServer $LocalvCenter

try {
	#Check if CustomAttributes Exist, if not create them
	if ((Get-CustomAttribute -Name 'RDMAttached' -TargetType VirtualMachine -ErrorAction:SilentlyContinue) -eq $null){
			Write-Host "Creating Custom Attribute RDMAttached"
			New-CustomAttribute -Name "RDMAttached" -TargetType VirtualMachine
	}


	#Write Annotations for VMs with RDMs Attached
	Write-Host "Writing Annotations" -NoNewline

	$VMwithRDM = Get-VM | Where-Object {$_ | Get-HardDisk -DiskType "RawPhysical","RawVirtual"}


	foreach($vm in $VMwithRDM){
		#Write annotations
		$vm|Set-Annotation -CustomAttribute "RDMAttached" -Value "True"
		Write-Host "." -NoNewline
	}#end Write Annotation
	Write-Host "`n"


} #end of try

Catch {
	Write-Host $_.Exception.Message -ForegroundColor Red
}

Finally{
	Write-Host "Disconnecting from vCenter"
	Disconnect-VIServer -Confirm:$false -Force:$true
}
This is a prezi presentation for at a talk I presented at a TechnologyUG event discussing the steps involved in planning any EUC project and the pitfalls to avoid.
I promise it was better with the full talk around the highlighted points, but it covers the major steps of going through an EUC project. Note that I say “EUC” not “VMware Horizon VDI” because it is better to discover the correct fit for a customer. I have seen projects fail because a consultant or customer have been doggedly attached to a specific idea or vendor where another solution or approach might be a better fit.
It doesn’t go into the greater detail of Application Virtualisation technologies such as AppVolumes, FlexApp, App-V, ThinApp due to time constraints but the greatest take away I want to push is that you must do a pre assessment of the current state. Without that you are doomed to failure.
This is an adaption of that script, advanced and simplified for restarting vSAN Services, which might be more applicable and useful for reuse in the future without the complexity of escape characters and spaces within the Likewise registry
This script is designed to run on a Windows Server 2012 R2 server using Powershell 4.0 along with plink (a command-line interface to the PuTTY back ends) which can be downloaded from https://www.putty.org
If you run the script it will produce a csv file called hosts.csv in the folder c:\temp to be used as a template. Running the script again with the csv file completed will proceed to run the script connecting to each host listed in the csv file and then output a csv file called export.csv in the c:\temp\ folder with the results.
On my latest project we had an issue with ESXi hosts joined to a disjointed namespace domain which resulted in a large amount of logfiles which quickly overwhelmed the host’s local log buffer and quickly reduced our Log Insight cluster’s planned retention period. The workaround was to make a change to the Registry in Likewise (setting DomainManagerIgnoreAllTrusts to “1”) on each host, which necessitated logging into each host and running some commands.
With the sheer number of hosts we were faced with, each with their own unique complex root password, and limited change windows, a script to automate this was called for. Especially if it can be quickly altered for reuse with other commands.
I apologise in advance to all my Powershell aficionado colleagues for the quality, but needs must.
This script is designed to run on a Windows Server 2012 R2 server using just Powershell 4.0 (no PowerCLI) along with plink (a command-line interface to the PuTTY back ends) which can be downloaded from https://www.putty.org
If you run the script it will produce a csv file called hosts.csv in the folder c:\temp to be used as a template. Running the script again with the csv file completed will proceed to run the script connecting to each host listed in the csv file and then output a csv file called export.csv in the c:\temp\ folder with the results.
I was asked to join a podcast with my colleague Matt Tupper to discuss all things VDI.
Joining us in this episode are Senior Consultants, Matt Tupper and Chris Mitchell, who talk us through Virtual Desktop Infrastructure (VDI). Our guests investigate the importance of VDI, its appeal to organisations, the key players within the space and the benefits that it’s adoption is bringing.
Matt and Chris also explore the trends in the adoption of VDI that Xtravirt are seeing among their clients, the potential pitfalls clients come across when moving towards it and the questions to ask to avoid mistakes, as well as where the future is heading.
What is VDI and why is it important?
Which market factors are driving adoption of the VDI model?
Who are the key players within VDI?
What are the potential pitfalls when moving towards a VDI model?
I had a requirement from a customer to identify log events in order to create alerts for several threat scenarios. This post is intended to provide a high-level description of the results for the scenarios for future reference or in case anyone finds a use. Please see the earlier post on enabling additional vCenter and PSC logging. http://www.caenotech.co.uk/vmware/configuration-of-rsyslog-on-vcsa-and-psc/
Access to vCenter Administrator role
The objective of the following is to ensure nobody other than certain colleagues have access to the Cryptography operations within vCenter and that all work carried out on crypto operations is done under suitable change control.
As can be seen the default syslog details the Administrator user logging in as VSPHERE.LOCAL\Administrator and the IP it has originated from
<datetime> <vCenterHostname> vcenter-server: User <Domain>\<Username>@<IPAddress> logged in as JAX-WS RI 2.2.9-b130926.1035 svn-revisions#<UID>

<datetime> <vCenterHostname> vpxd <eventID> - - Event [<LineID>] [1-1] [<datetime>] [vim.event.UserLoginSessionEvent] [info] [<Domain>\<Username>] [] [LineID] [User <Domain>\<Username>@<IPAddress> logged in as JAX-WS RI 2.2.9-b130926.1035 svn-revisions#<UID>]

<datetime> <vCenterHostname> vcenter-server: User <Domain>\<Username>@<IPAddress> logged out (login time: <datetime>, number of API invocations: <x>, user agent: JAX-WS RI 2.2.9-b130926.1035 svn-revisions#<UID>)

<datetime> <vCenterHostname> vpxd <eventID> - - Event [<LineID>] [1-1] [<datetime>] [vim.event.UserLoginSessionEvent] [info] [<Domain>\<Username>] [] [LineID] [User <Domain>\<Username>@<IPAddress> logged out (login time: <datetime>, number of API invocations: <x>, user agent: JAX-WS RI 2.2.9-b130926.1035 svn-revisions#<UID>)]
the text strings “vim.event.UserLoginSessionEvent” and “vim.event.UserLogoutSessionEvent” can be used to alert on people logging into the vCenter
Alteration of vCenter Roles
Creation of a new vCenter role “newCryptoRole”
From the default log we can show that the new role is created however does not show whom by or which permissions it is given.
<datetime> <vCenterHostname> vcenter-server: New role <roleName> created

<datetime> <vCenterHostname> vpxd <eventID> - - Event [<LineID>] [1-1] [<datetime>] [vim.event.RoleAddedEvent] [info] [] [] [LineID] [New role <roleName> created]
This is where the additional vpxd-svcs log is required for details of who completed the action and what permissions were assigned to the role
[tomcat-exec-176 INFO AuthorizationService.AuditLog opId=] Action performed by principal(name=VSPHERE.LOCAL\Administrator,isGroup=false):Add role Id=-922973018,Name=newCryptoRole,Description=,Tenant=Privileges=[System.Anonymous, System.Read, System.View, Cryptographer.Clone, Cryptographer.Encrypt, Cryptographer.Migrate, Cryptographer.RegisterVM, Cryptographer.ManageKeyServers, Cryptographer.Decrypt, Cryptographer.AddDisk, Cryptographer.ManageKeys, Cryptographer.ManageEncryptionPolicy, Cryptographer.Access, Cryptographer.Recrypt, Cryptographer.RegisterHost, Cryptographer.EncryptNew]
Modification of permissions to any vCenter role
<datetime> <vCenterHostname> vcenter-server: Role modified
Previous name: <roleName>, new name <newRoleName>
Added privileges: <privilegesAdded>
Removed privileges: <privilegesRemoved>

<datetime> <vCenterHostname> vpxd <eventID> - - Event [<LineID>] [1-1] [<datetime>] [vim.event.RoleUpdatedEvent] [info] [] [] [LineID] [Role modified
Previous name: <roleName>, new name <newRoleName>
Added privileges: <privilegesAdded>
Removed privileges: <privilegesRemoved>]
From the default log we can show that the role is modified and which permissions have been added, however does not show whom by. This is where the additional vpxd-svcs log is required for details of who completed the action
[tomcat-exec-17 INFO AuthorizationService.AuditLog opId=a794037d-a725-4b89-ab96-d3a23a58648c] Action performed by principal(name=VSPHERE.LOCAL\Administrator,isGroup=false):Update role Id=-922973018,Name=newCryptoRole,Description=,Tenant=Privileges=[System.Anonymous, Cryptographer.Clone, Cryptographer.Encrypt, Cryptographer.Migrate, Cryptographer.RegisterVM, Cryptographer.ManageKeyServers, Cryptographer.Decrypt, Cryptographer.AddDisk, Cryptographer.ManageKeys, Cryptographer.ManageEncryptionPolicy, System.View, Cryptographer.Access, Cryptographer.Recrypt, Cryptographer.RegisterHost, System.Read, Cryptographer.EncryptNew, Network.Assign, Network.Config, Network.Move, Network.Delete, Task.Create, Task.Update]
From the default log we can show that the role is removed, however does not show whom by. This is where the additional vpxd-svcs log is required for details of who completed the action
[tomcat-exec-2 INFO AuthorizationService.AuditLog opId=c0100be8-9114-4e60-9520-4cf1b6015793] Action performed by principal(name=VSPHERE.LOCAL\Administrator,isGroup=false):Delete role -922973018
Assignment of User to a Role
Assigning a user to a role is not recorded in the default logs, this requires the additional vpxd-svcs log
[tomcat-exec-232 INFO AuthorizationService.AuditLog opId=] Action performed by principal(name=VSPHERE.LOCAL\Administrator,isGroup=false):Added access control [ Principal=Name=VSPHERE.LOCAL\newCryptoUser,isGroup=false,roles=[-922973018],propogating=true ] to document urn:acl:global:permissions
If you attempt to assign a user to a role with higher permissions that your current user you will receive the following error message in the vCenter Web UI
Additionally the following event is recorded in the vpxd-svcs.log
[tomcat-exec-293 WARN com.vmware.cis.authorization.impl.AclPrivilegeValidator opId=] User VSPHERE.LOCAL\newUser does not have privileges [System.Anonymous, Cryptographer.Clone, Cryptographer.Encrypt, Cryptographer.Migrate, Cryptographer.RegisterVM, Cryptographer.ManageKeyServers, Cryptographer.Decrypt, Cryptographer.AddDisk, Cryptographer.ManageKeys, Cryptographer.ManageEncryptionPolicy, System.View, Cryptographer.Access, Cryptographer.Recrypt, Cryptographer.RegisterHost, Authorization.ModifyPermissions, System.Read, Cryptographer.EncryptNew] on object urn%3Aacl%3Aglobal%3Apermissions
Adding user to Platform Services Controller SSO Groups
In order to capture logs showing adding user to the “SystemConfiguration.BashShellAdministrators” group we require the additional logs ssoAdminServer.log and vmdir-syslog.log
./sso/ssoAdminServer.log:
pool-4-thread-1 opId=73c87e6b-746c-46f2-9b59-a5da95f5a1c1 INFO com.vmware.identity.admin.vlsi.PrincipalManagementServiceImpl] [User {Name: Administrator, Domain: vsphere.local} with role 'Administrator'] Adding users to local group 'SystemConfiguration.BashShellAdministrators'
./vmdird/vmdird-syslog.log:
info vmdird t@139993972463360: MOD 1,add,member: (CN=Administrator,CN=Users,DC=vsphere,DC=local) info vmdird t@139993972463360: Modify Entry (CN=SystemConfiguration.BashShellAdministrators,DC=vsphere,DC=local)(from 127.0.0.1)(by <PSCName>@vsphere.local)(via Ext)(USN 4974)
Cryptographic Components
The objective of these alerts are to ensure that vSAN encryption is not disabled (where enabled) or enabled (where it’s not). Equally, any tampering with KMS (required for encryption) should be correlated back to change control / incident management.
As user with “Administrator – No Cryptography” if you try to disable encryption on vSAN they do not receive the option due to a lack of privileges
Disable vSAN Encryption
In this test, vSAN encryption was disabled. This is considered a reconfiguration of vSAN and logged accordingly.
Default vCenter logs show that vSAN is
being reconfigured:
ESXi Host logs show that on the string [VsanSystemImpl::Update] the vSAN is being reconfigured and has encryption set to ‘enabled=true’.
Adding a KMS Server
The event of adding an additional KMS is logged, specifying the KMS alias name and the KMS Cluster into which it is added.
<datetime> <vCenterHostname> vpxd <eventID> - - <date> info vpxd[<Rand>] [Originator@xxxx sub=CryptoManager opID-KmipServerPageMediator-add-xxxxx-ngc:<rand>] A new Kmip Server <KMSName> is registered in cluster <KMSCluster>
The string “A new Kmip Server” can be used to alert on a new KMS server being added to the KMS Cluster.
Delete a KMS Server
The KMS Server was unregistered from the
VMware vCenter.
The following event described the removal.
<datetime> <vCenterHostname> vpxd <eventID> - - <date> info vpxd[<Rand>] [Originator@xxxx sub=CryptoManager opID-KmipServerActionResolver-remove-xxxxx-ngc:<rand>] Kmip Server <KMSName> is removed from cluster <KMSCluster>
vMotion
vMotion a VM from vSAN Datastore to Local Storage
The Test Virtual Machine (permbound1) was migrated from vSAN ‘vSANDatastore’ to local storage named ‘ds-local-ESXiHostnameLocalDS’
The following events were recorded by the default vCenter logs.
vcenter-server: Migrating <VMname> from <ESXiHostname>, <datastoreName> to <ESXiHostname>, <datastoreName> in <vCenterDatacenter>
The event is in the format and notes the time, who carried out the migration under the field “vc_username”, what was migrated, and the source/destination hosts and datastores.
Upgrading the existing VMware Log Insight (vRLI) appliances using upgrade pak method. The steps are for 4.6.0 to 4.6.1 but are applicable to all 4.x upgrades.
Overview
This will detail the steps required for the In-place Upgrade Procedure of a VMware vRealize Log Insight (vRLI) Appliance
Pre-requisites:
Verify that VMware Log Insight is properly
configured.
Download required upgrade files and update
script.
Upgrading must be done from the master
node’s FQDN. Upgrading with the Integrated Load Balancer IP address is not
supported.
When performing a manual upgrade, you must
upgrade workers one at a time. Upgrading multiple workers at the same time
causes an upgrade failure. When you upgrade the master node to vRealize Log
Insight 4.6.1, a rolling upgrade occurs unless specifically disabled.
If the vRealize Log Insight upgrade (.pak
file) has a new JRE version, then the
user-installed certificates in a vRealize Log Insight setup (such as for event
forwarding) become invisible after upgrade.
Upgrade Method:
Take snapshots of the VMware Log Insight nodes.
Recommendation: Shutdown appliances before taking snapshots if you cannot guarantee application consistency.
To apply the update we need to login into our Log Insight appliance web interface. Choose Administration in the upper right corner.
In the navigation bar on the left side we select Management > Cluster > Upgrade Cluster.
After clicking Upgrade Cluster you need to browse to the PAK file which was downloaded.
After clicking “Upgrade” the package will be uploaded to the appliance.
Accept the EULA to start the update. The procedure will take a couple of minutes.
After successfully updating the appliance you’ll get a message with the now active version of vRealize Log Insight. There’s no need for a reboot.
As part of a client’s environment, there was a requirement from the end customer to forward additional logging information above the default logs forwarded by vCenter Server and Platform Services Controller (PSC).
In order to provide these additional logs
configuration of rSyslog is required to specify these files.
This post is intended to provide steps to implement these changes.
Additional logging available from non default vCenter logs
Single Sign-On Activities
Successful SSO Login
Successful SSO Logout
Successful SSO Active Directory Login
Successful SSO Active Directory Logout
Failed SSO Login
Failed SSO Login (User not found)
Failed SSO Active Directory Login
Failed SSO Active Directory Login (User not found)
SSO User Creation
SSO User Password Change
SSO User Deletion
SSO Group Creation
SSO Group Assignment
SSO Group Deletion
SSO Password policy update
vCenter Server Activities
Successful vCenter Server Login
Successful vCenter Server Logout
vSphere Permission Created
vSphere Permission Updated
vSphere Permission Deleted
vSphere Role Creation
vSphere Role Update
vSphere Role Deletion
In order to capture the above activities, you will need to forward the following log files:
/var/log/vmware/sso/vmware-sts-idmd.log
/var/log/vmware/sso/ssoAdminServer.log
/var/log/vmware/vpxd-svcs/vpxd-svcs.log
/var/log/vmware/vpx/vpxd.log
NOTE: I am not including the vpxd.log in my implementation below as it is an extremely verbose log and we did not require it for the security events we wished to capture. Additionally I don’t want someone blindly copying the config below without understanding it and accidentally upsetting their environment.
Implementation Steps
VMware Appliance Management Interface (VAMI)
Step 1 – Connect to the VAMI interface
for all vCenters and PSCs on HTTPS with port 5480
https://<appliancename>:5480
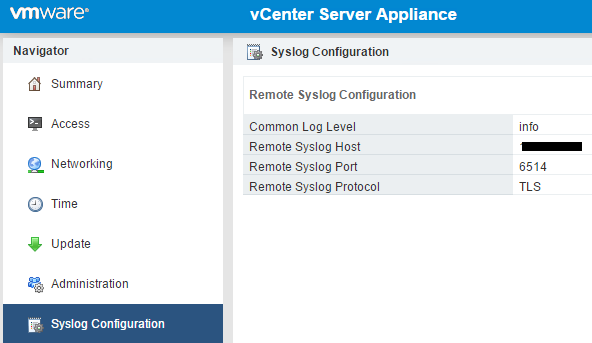
Step 2 – Configure Syslog with the
following settings.
Common Log Level
Info
Remote Syslog Host
<vRLI-LoadBalancer-VIP>
Remote Syslog Port
6514
Remote Syslog Protocol
TLS
vCenter Server Appliance
Step 1 – SSH to the VCSA and open the following file /etc/rsyslog.conf for editing.
vi /etc/rsyslog.conf
Step 2 – Press [Insert] to put vi into insert mode and add following entry towards the top of the file at the bottom of the ###### Module declarations ###### section.
$ModLoad imfile
Step 3 – Add the following right below the “###### Rule declarations
######” section of the rsyslog configuration file
$InputFileName specifies the log file that we want to forward.
$InputFileTag is the appname that will show up when it is forwarded to your remote syslog server
$InputFileStateFile is the log monitoring file.
$InputFilePollInterval is set 20 seconds, the default is 10 if you leave it blank.
Step 4 – Save your changes by pressing [Esc] and typing and pressing enter:
:wq
Step 5 – Restart the rsyslog service in the VCSA for the changes to go into effect by running the following command:
systemctl restart rsyslog
Platform Services Controller Appliance
Step 1 – SSH to the PSC and open the following file /etc/rsyslog.conf for editing.
vi /etc/rsyslog.conf
Step 2 – Press [Insert] to put vi into insert mode and add following entry towards the top of the file at the bottom of the ###### Module declarations ###### section.
$ModLoad imfile
Step 3 – Add the following right below the “###### Rule declarations ######” section of the rsyslog configuration file
Upgrading VMware Identity Manager (vIDM) or WorkspaceOne appliances can result in some difficult issues, so in order to save you having to bug GSS, below is the detail for upgrading from 2.9.1 to 3.3 using the offline upgrade method. Make sure to follow all of the pre-requisite and post upgrade sections.
Overview
You can upgrade VMware Identity Manager online or offline. In version 2.9.x and below the only officially supported route was using the online or local web host method.
By default the VMware Identity Manager appliance uses the VMware web site for the upgrade procedure, which requires the appliance to have Internet connectivity. You must also configure proxy server settings for the appliance, if applicable.
Thanks to an unadvertised Knowledge Base article KB2147931https://kb.vmware.com/s/article/2147931 it is now possible to upgrade via the offline upgrade script which was previously only offered in 3.1 and above.
The following procedure can be used to upgrade vIDM appliances from 2.9.1 through to 3.3. When necessary please download the relevant updates and associated offline upgrade scripts found in the appendix of this document.
Due to additional VMware solutions deployed the following sequence is recommended. (note: there is not direct upgrade path from 2.9.2.1 to 3.3)
Upgrade vIDM from 2.9.1 to 2.9.2.1
Upgrade vRealize Operations Manager to 6.7
Upgrade vRealize Log Insight to 4.6
Upgrade vIDM from 2.9.2.1 to 3.1
Upgrade vIDM from 3.1 to 3.2.0.1
Please refer to the 3.2 upgrade pre-requisites before upgrading from 3.1 to 3.2
Upgrade vIDM from 3.2.0.1 to 3.3
Please refer to the 3.3 upgrade pre-requisites before upgrading from 3.2 to 3.3
Available upgrade options:
Online upgrade (requires connectivity to vmware.com).
Offline upgrade with local Web Server hosting update files.
Offline upgrade with script and update binaries.
Offline upgrade with manual steps and update binaries if
method 3 fails.
Due to security restrictions imposed,
we will be using option 3, or option 4 if that fails.
Important: Expect some downtime
during the upgrade process as all services are stopped during the upgrade.
Pre-requisites:
Verify that VMware Identity Manager is properly configured.
Verify that at least 4 GB of disk space is available on the primary root partition of the virtual appliances
If you are using an external database, take a snapshot or backup of the database. If you are unable to perform application consistent backup, shutdown component before taking snapshot.
Download required upgrade files and update script.
Download the following Upgrade Files from my.vmware.com :
Apply the new iptables rule by running the following script:
/usr/local/horizon/scripts/updateiptables.hzn
7. Run the migration report.
In a browser, go to http://<ES_NODE_FQDN>:9200/_plugin/migration, where <ES_NODE_FQDN> is the fully-qualified domain name of the VMware Identity Manager node on which you installed the migration plugin.
Click the Run checks now button.
8. View the migration report and look for red indices.
Indices that are red
because they are closed are expected items on the report and can be ignored.
Any indices that are red for any reason other than that they are closed, for
example, due to mapping conflicts, need to be deleted. Use the following
command to delete the indices:
curl -XDELETE http://localhost:9200/<INDEX_NAME>
9. Block port 9200 again.
Edit the /usr/local/horizon/conf/iptables/elasticsearch file and set ELASTICSEARCH_tcp_all to “”.
There are two potential upgrade faults when upgrading to
3.3. Please apply these workarounds before completing the upgrade else there is
a potential for the upgrade to fail and the only fix is to revert the snapshot.
Recommendation: Shutdown appliances before taking snapshots if you cannot guarantee application consistency.
Remove all nodes except one from the NSX load balancer.
Requires NSX management plane access
From the Home menu of the vSphere Web Client, select Networking & Security.
In the Navigator, click NSX Edges.
From the NSX Manager drop-down menu, select <NSX Manager IP> and double-click the <NSX Edge providing LB functionality> NSX Edge to open its network settings.
On the Manage tab, click the Load Balancer tab and click Pools.
Select the VIDM pool that contains the vRealize Identity Manager appliances and click Edit.
In the Edit Pool dialog box, select the secondary node, click Edit, select Disable from the State drop-down menu, and click OK.
In the Edit Pool dialog box, select NONE from the Monitors drop-down menu and click OK.
Upgrade Method 3: Perform
Offline Upgrade using script and update files.
1 .Upgrade the node that is still connected to the load balancer. You can use the updateoffline.hzn script to perform an offline upgrade of the VMware Identity Manager virtual appliance
2. Run the updateoffline.hzn script as the root user.
If upgrade fails proceed to Upgrade Method 4: Manual Steps.
2. If you did not use the -r option with the script, restart the virtual appliance after upgrade is complete.
Reboot
3. After the node is upgraded, leave it connected to the load balancer. This ensures that the VMware Identity Manager service is available while you upgrade the other nodes.
4. Upgrade the other nodes one at a time.
5. If upgrading to 3.2, complete post 3.2 upgrade tasks
Upgrade Method 4: Perform
Offline Upgrade using manual steps and update files.
Download the
updaterepo.zip and copy under /var/tmp
mkdir /var/tmp/update
cd /var/tmp/update
unzip ../identity<fullfilename>.zip
iptables -A INPUT -p tcp --dport 8008 -m state --state NEW,ESTABLISHED -j ACCEPT
python -m SimpleHTTPServer 8008 2>/dev/null &
/usr/local/horizon/update/updatelocal.hzn seturl http://localhost:8008/
2. confirm from a browser that you can browse files for http://hostname:8008
3. Run the following commands to install the update
4. Restart the virtual appliance after upgrade is complete.
Reboot
5. After the node is upgraded, leave it connected to the load balancer. This ensures that the VMware Identity Manager service is available while you upgrade the other nodes.
6. Upgrade the other nodes one at a time.
7. If upgrading to 3.2, complete post 3.2 upgrade tasks to fix ElasticSearch
8. Perform Upgrade Validation
9. If upgrade fails and there is a message referencing inode usage see this post HERE
Upgrade Validation
After all the nodes are upgraded, add them back to the load balancer.
Validate health of vIDM
Validate vIDM functionality
Validate health of elastic search cluster is green with no unallocated shards
5. Remove old update files and consolidate snapshots.
Post 2.9.2 Upgrade Validation
Verify that RabbitMQ is not running in cluster mode in the upgraded nodes.
In 2.9.1 and later releases, RabbitMQ clustering has been disabled.
Follow these commands for each upgraded node.
Log in to the upgraded node.
Run the following command:
rabbitmqctl cluster_status
The
command should return status similar to the following:
sva-1:~ # rabbitmqctl cluster_status
Cluster status of node 'rabbitmq@sva-1' ...
[{nodes,[{disc,['rabbitmq@sva-1']}]},
 {running_nodes,['rabbitmq@sva-1']},
 {cluster_name,<<"rabbitmq@sva-1.hs.trcint.com">>},
 {partitions,[]},
 {alarms,[{'rabbitmq@sva-1',[]}]}]
3. If the status includes references to any node other than the one on which you ran the rabbitmqctl cluster_status command, run the following commands:
service elasticsearch restart
service horizon-workspace restart
Wait at least 15 minutes for the services to fully restart before continuing to the next node.
Troubleshooting
If you get the “there was a problem with analytics service” error in the Health status post upgrade it usually means there is an issue with ElasticSearch, and usually due to unassigned shards.
1. Run the following command to determine if you have unassigned shards.
curl http://localhost:9200/_cluster/health?pretty
2. Run the following command to view the unassigned shards.
Since vRealize Log Insight 4.5 the agent has recursive directory support, however there is a requirement for them to be at least 2 levels deep
If you attempt to configure a log directory less than 2 levels deep using a wildcard it will be accepted on the Log Insight Agent config UI however on the end point you will receive the following error within the LIAgent log directory. (C:\ProgramData\VMware\Log Insight Agent\Logs)
2019-02-07 11:01:59.592025 0x000026e4 <error> FLogCollectorEx:452| Failed to initialize channel [filelog|com.microsoft.iis.IISWildcard] because of improper configuration. DirectoryMonitorEx::CheckBasePathEligible(): The base path should be at least 2 level(s) deep: [D:\Logfiles].
Unfortunately at this time there is no work around.
This is a blog I’ve decided to put together in order to keep track of the discoveries I have stumbled across whilst working with virtualisation technologies. If anyone else finds something useful then that’s a bonus.