vSAN Health Alarm Check Script (Using PowerCLI)

NSX Manager to login with a local account

In the third and final part of this series I have taken my basic skeleton from the previous two blogs in order to solve the issue of bringing all of the vSAN Skyline Health checks into one central location using a vSAN Health Alarm Check Script.

My two previous blogs can be found here:
NSX Backup Check Script (Using the NSX Web API)
NSX Alarm Check Script (Using the NSX REST API)

Unfortunately this time, despite best efforts I was unable to get a suitable result using the vCenter REST API. Documentation is lacking and I was not able to get full results for the Skyline Health Checks. From asking around it seems that PowerCLI holds the answer for me, so it gave me an excuse to adapt the script again and get it to work with PowerCLI.

Again you might be asking ‘why not just use the vSAN Management Pack for vROps?’ but alas it does not keep pace with the vSAN Skyline Health and it is missing some alarms.

PowerCLI

For those not aware of everything PowerCLI can do you can find the full reference of the vSphere and vSAN cmdlets here:

https://developer.vmware.com/docs/powercli/latest/products/vmwarevsphereandvsan/

We are going to be using the Get-VSANView cmdlet in order to pull out the information from the vCenter.

The health information we can get with the “VsanVcClusterHealthSystem-vsan-cluster-health-system” Managed Object. Details of this can be found here:

https://vdc-download.vmware.com/vmwb-repository/dcr-public/3325c370-b58c-4799-99ff-58ae3baac1bd/45789cc5-aba1-48bc-a320-5e35142b50af/doc/vim.cluster.VsanVcClusterHealthSystem.html

The Code Changes

The Try Catch has been changed to connect to the vCenter first and then call a function to get the vSAN Health Summary

try{
    Connect-VIServer -Server $vCenter -Credential $encodedlogin
    $Clusters = Get-Cluster

    foreach ($Cluster in $Clusters) {
        Get-VsanHealthSummary -Cluster $Cluster
    }
 }
catch {catchFailure}

So lets have a look at the function itself.

The Get vSAN Cluster Health function

I have written a function to take in a cluster name as a parameter, find the Managed Object Reference (MORef) for the cluster, and then query the vCenter for the vSAN cluster health for that MORef and output any which are Yellow (Warning) or Red (Critical)

Function Get-VsanHealthSummary {

    param(
        [Parameter(Mandatory=$true)][String]$Cluster
    )
    
    $vchs = Get-VSANView -Id "VsanVcClusterHealthSystem-vsan-cluster-health-system"
    $cluster_view = (Get-Cluster -Name $Cluster).ExtensionData.MoRef
    $results = $vchs.VsanQueryVcClusterHealthSummary($cluster_view,$null,$null,$true,$null,$null,'defaultView')
    $healthCheckGroups = $results.groups
    $timestamp = (Get-Date).ToString("yyyy/MM/dd HH:mm:ss")

    foreach($healthCheckGroup in $healthCheckGroups) {
        
        $Health = @("Yellow","Red")
        $output = $healthCheckGroup.grouptests | where TestHealth -in $Health | select TestHealth,@{l="TestId";e={$_.testid.split(".") | select -last 1}},TestName,TestShortDescription,@{l="Group";e={$healthCheckGroup.GroupName}}
        $healthCheckTestHealth = $output.TestHealth
        $healthCheckTestName = $output.TestName
        $healthCheckTestShortDescription = $output.TestShortDescription
        
        if ($healthCheckTestHealth -eq "yellow") {
            $healthCheckTestHealthAlt = "Warning"
        }
        if ($healthCheckTestHealth -eq "red") {
            $healthCheckTestHealthAlt = "Critical"
            }
        if ($healthCheckTestName){
            Add-Content -Path $exportpath -Value "$timestamp [$healthCheckTestHealthAlt] $vCenter - vSAN Clustername $Cluster vSAN Alarm Name $healthCheckTestName Alarm Description $healthCheckTestShortDescription"
            Start-Sleep -Seconds 1
        }
    }
}

Saving Credentials

This time as we are using PowerCLI and Connect-VIServer we cannot use the encoded credentials we used last time for the Web and REST API, so we will use the cmdlet Export-CLIxml which allows us to create an XML-based representation of an object and stores it in a file.

Further details of this utility can be found here:

https://learn.microsoft.com/en-us/powershell/module/microsoft.powershell.utility/export-clixml?view=powershell-7.3

We will use the Get-Credential to bring in the username and password to store and then export it to the path defined in the variables at the top of the script.

if (-Not(Test-Path -Path  $credPath)) {
    $credential = Get-Credential
    $credential | Export-Clixml -Path $credPath

}

$encodedlogin = Import-Clixml -Path $credPath

Handling the Outputs.

As per my previous scripts the outputs are formatted to be ingested into a syslog server (vRealize Log Insight in this case) which would then send emails to the appropriate places and allow for a nice dashboard for quick whole estate checks.

The Final vSAN Health Alarm Check Script

I have put all the variables at the top and the script is designed to be run in a folder and to have another separate folder with the logs. This was done in order to manage multiple scripts logging to the same location
eg:
c:\scripts\NSXBackupCheck\NSXBackupCheck.ps1
c:\scripts\Logs\NSXBackupCheck.log

param ($vCenter)

$curDir = &{$MyInvocation.PSScriptRoot}
$exportpath = "$curDir\..\Logs\vSANAlarmCheck.log"
$credPath = "$curDir\$vCenter.cred"
$scriptName = &{$MyInvocation.ScriptName}

add-type @"
   using System.Net;
   using System.Security.Cryptography.X509Certificates;
   public class TrustAllCertsPolicy : ICertificatePolicy {
      public bool CheckValidationResult(
      ServicePoint srvPoint, X509Certificate certificate,
      WebRequest request, int certificateProblem) {
      return true;
   }
}
"@
[System.Net.ServicePointManager]::CertificatePolicy = New-Object TrustAllCertsPolicy

Function Get-VsanHealthSummary {

    param(
        [Parameter(Mandatory=$true)][String]$Cluster
    )
    
    $vchs = Get-VSANView -Id "VsanVcClusterHealthSystem-vsan-cluster-health-system"
    $cluster_view = (Get-Cluster -Name $Cluster).ExtensionData.MoRef
    $results = $vchs.VsanQueryVcClusterHealthSummary($cluster_view,$null,$null,$true,$null,$null,'defaultView')
    $healthCheckGroups = $results.groups
    $timestamp = (Get-Date).ToString("yyyy/MM/dd HH:mm:ss")

    foreach($healthCheckGroup in $healthCheckGroups) {

        
        $Health = @("Yellow","Red")
        $output = $healthCheckGroup.grouptests | where TestHealth -in $Health | select TestHealth,@{l="TestId";e={$_.testid.split(".") | select -last 1}},TestName,TestShortDescription,@{l="Group";e={$healthCheckGroup.GroupName}}
        $healthCheckTestHealth = $output.TestHealth
        $healthCheckTestName = $output.TestName
        $healthCheckTestShortDescription = $output.TestShortDescription
        
        if ($healthCheckTestHealth -eq "yellow") {
            $healthCheckTestHealthAlt = "Warning"
        }

        if ($healthCheckTestHealth -eq "red") {
            $healthCheckTestHealthAlt = "Critical"
            }


        if ($healthCheckTestName){
            Add-Content -Path $exportpath -Value "$timestamp [$healthCheckTestHealthAlt] $vCenter - vSAN Clustername $Cluster vSAN Alarm Name $healthCheckTestName Alarm Description $healthCheckTestShortDescription"
            Start-Sleep -Seconds 1
        }
    }

}

function catchFailure {
    $timestamp = (Get-Date).ToString("yyyy/MM/dd HH:mm:ss")
    if (Test-Connection -BufferSize 32 -Count 1 -ComputerName $vCenter -Quiet) {
        Add-Content -Path $exportpath -Value "$timestamp [ERROR] $vCenter - $_"
    }
    else {
        Add-Content -Path $exportpath -Value "$timestamp [ERROR] $vCenter - Host Not Found"
    }
exit
}

if (!$vCenter) {
    Write-Host "please provide parameter 'vCenter' in the format '$scriptName -vCenter [FQDN of vCenter Server]'"
    exit
    }

if (-Not(Test-Path -Path  $credPath)) {
    $credential = Get-Credential
    $credential | Export-Clixml -Path $credPath

}

$encodedlogin = Import-Clixml -Path $credPath


try{
    Connect-VIServer -Server $vCenter -Credential $encodedlogin
    $Clusters = Get-Cluster

    foreach ($Cluster in $Clusters) {
        Get-VsanHealthSummary -Cluster $Cluster
    }
 }
catch {catchFailure}

Disconnect-VIServer $vCenter -Confirm:$false

Overview

The final script above can be altered to be used as a skeleton for any other PowerShell or PowerCLI commands, as well as being adapted for REST APIs and Web API as per the previous Blogs. Important to note that these will use a different credential store function.

The two previous blogs can be found here:
NSX Backup Check Script (Using the NSX Web API)
NSX Alarm Check Script (Using the NSX REST API)

NSX Alarm Check Script (Using the NSX REST API)

NSX Manager to login with a local account

In my previous blog I created a script to get the last backup status from NSX Manager in order to quickly check multiple NSX Managers. Today I had a need to bring the alarms raised in all of these NSX Managers into one single location, which necessitated creating an NSX Alarm Check Script.
‘But surely the NSX Management Pack would allow you to do this you?’ may ask. Unfortunately it is missing some of the alarms which gets raised on the NSX Managers such as passwords expiring for example. This one being an annoyance if you do not notice until after it’s expired and you are having LDAP issues.

Now luckily this time, we CAN use the NSX REST API to get these details, and I had a script lying around which could provide a skeleton for this. You can find that script here: NSX Backup Check Script

In order to adapt this script to use REST we need to change the Invoke-WebMethod to Invoke-RestMethod

Interrogating NSX REST API

I used the documentation from VMware {code} to find this API and how to handle the results. Luckily this is a lot more detailed than the web API. You can find the NSX API details here:

https://developer.vmware.com/apis/547/nsx-t

so we want to request /api/v1/alarms in order to return a list of all alarms on the nsx managers.

$result = Invoke-RestMethod -Uri https://$nsxmgr/api/v1/alarms -Headers $Header -Method 'GET' -UseBasicParsing

Handling the Outputs.

Running this command will give a response similar to this:

{
  "result_count": 4,
  "results": [
      {
        "id": "xxxx",
        "status": "OPEN",
        "feature_name": "manager_health",
        "event_type": "manager_cpu_usage_high",
        "feature_display_name": "Manager Health",
        "event_type_display_name": "CPU Usage High",
        "node_id": "xxxx",
        "last_reported_time": 1551994806,
        "description": |
          "The CPU usage for the manager node identified by 
           appears to be\nrising.",
        "recommended_action": |
          "Use the top command to check which processes have the most CPU
           usages, and\nthen check \/var\/log\/syslog and these processes'
           local logs to see if there\nare any outstanding errors to be
           resolved.",
        "node_resource_type": "ClusterNodeConfig",
        "severity": "WARNING",
        "entity_resource_type": "ClusterNodeConfig",
      },
      ...
  ]
}

From this output I wanted to pull out the severity, status, alarm description and the node which was impacted, so I pulled these into an array and add the items to variables.

$nsxAlarms = $result.results 
    foreach ($nsxAlarm in $nsxalarms) {
        $nsxAlarmCreated = (get-date 01.01.1970).AddSeconds([int]($nsxAlarm._create_time/1000)).ToString("yyyy/MM/dd HH:mm:ss")
        $timestamp = (Get-Date).ToString("yyyy/MM/dd HH:mm:ss")
        $nsxAlarmSeverity = $nsxAlarm.severity
        $nsxAlarmStatus = $nsxAlarm.status
        $nsxAlarmNode_display_name = $nsxAlarm.node_display_name
        $nsxAlarmDescription = $nsxAlarm.description

From here I wanted to only include any alarms which had not been marked acknowledged or resolved to avoid constantly reporting a condition which was known about.

if($nsxAlarm.status -ne "ACKNOWLEDGED" -and $nsxAlarm.status -ne "RESOLVED"){ 
    Add-Content -Path $exportpath -Value "$timestamp [$nsxAlarmSeverity] $NSXMGR - Alarm Created $nsxAlarmCreated Status $nsxAlarmStatus Affected Node $nsxAlarmNode_display_name Description  $nsxAlarmDescription"
}

It is also possible to bypass this by running the following command, however I wanted to pull in all alarms for my specific use case.

GET /api/v1/alarms?status=OPEN

As per the previous script, this was wrapped in a try catch and the catch failure tested if the host was up. A full explanation can be found on the blog about this script here: NSX Backup Check Script

.

The Final NSX Alarm Check Script

param ($nsxmgr)

$curDir = &{$MyInvocation.PSScriptRoot}
$exportpath = "$curDir\..\Logs\NSXAlarmCheck.log"
$credPath = "$curDir\$nsxmgr.cred"
$scriptName = &{$MyInvocation.ScriptName}

add-type @"
   using System.Net;
   using System.Security.Cryptography.X509Certificates;
   public class TrustAllCertsPolicy : ICertificatePolicy {
      public bool CheckValidationResult(
      ServicePoint srvPoint, X509Certificate certificate,
      WebRequest request, int certificateProblem) {
      return true;
   }
}
"@
[System.Net.ServicePointManager]::CertificatePolicy = New-Object TrustAllCertsPolicy

function catchFailure {
    $timestamp = (Get-Date).ToString("yyyy/MM/dd HH:mm:ss")
    if (Test-Connection -BufferSize 32 -Count 1 -ComputerName $nsxmgr -Quiet) {
        Add-Content -Path $exportpath -Value "$timestamp [ERROR] $NSXMGR - $_"
    }
    else {
        Add-Content -Path $exportpath -Value "$timestamp [ERROR] $NSXMGR - Host Not Found"
    }
exit
}

if (!$nsxmgr) {
    Write-Host "please provide parameter 'nsxmgr' in the format '$scriptName -nsxmgr [FQDN of NSX Manager]'"
    exit
    }

if (-Not(Test-Path -Path  $credPath)) {
    $username = Read-Host "Enter username for NSX Manager" 
    $pass = Read-Host "Enter password" -AsSecureString 
    $password = [System.Runtime.InteropServices.Marshal]::PtrToStringAuto([System.Runtime.InteropServices.Marshal]::SecureStringToBSTR($pass))
    $userpass  = $username + ":" + $password

    $bytes= [System.Text.Encoding]::UTF8.GetBytes($userpass)
    $encodedlogin=[Convert]::ToBase64String($bytes)
    
    Set-Content -Path $credPath -Value $encodedlogin
}

$encodedlogin = Get-Content -Path $credPath

$authheader = "Basic " + $encodedlogin
$header = New-Object "System.Collections.Generic.Dictionary[[String],[String]]"
$header.Add("Authorization",$authheader)

try{
    $result = Invoke-RestMethod -Uri https://$nsxmgr/api/v1/alarms -Headers $Header -Method 'GET' -UseBasicParsing

        $nsxAlarms = $result.results 
        foreach ($nsxAlarm in $nsxalarms) {
            
            $nsxAlarmCreated = (get-date 01.01.1970).AddSeconds([int]($nsxAlarm._create_time/1000)).ToString("yyyy/MM/dd HH:mm:ss")
            $timestamp = (Get-Date).ToString("yyyy/MM/dd HH:mm:ss")
            $nsxAlarmSeverity = $nsxAlarm.severity
            $nsxAlarmStatus = $nsxAlarm.status
            $nsxAlarmNode_display_name = $nsxAlarm.node_display_name
            $nsxAlarmDescription = $nsxAlarm.description

            if($nsxAlarm.status -ne "ACKNOWLEDGED" -and $nsxAlarm.status -ne "RESOLVED"){ 
                Add-Content -Path $exportpath -Value "$timestamp [$nsxAlarmSeverity] $NSXMGR - Alarm Created $nsxAlarmCreated Status $nsxAlarmStatus Affected Node $nsxAlarmNode_display_name Description  $nsxAlarmDescription"
            }
        
    }
 }
catch {catchFailure}

Overview

The final script above can be altered to be used as a skeleton for any other Invoke-RestRequest APIs as well as simply being adapted for Web API. I will be following up this post with further updates to adapt the script in order to use PowerCLI, which required a different credential store.


NSX Backup Check Script (Using the NSX Web API)

NSX Manager to login with a local account

I was recently asked for a way to have a simple check and report on the last backup status for a global company with multiple VMware NSX managers.

For some reason their NSX Managers were not reporting the backup status via syslog to VMware vRealize Log Insight (vRLI) and even if it was, they only have one vRLI cluster per site and wanted one simple place to do their daily checks.

So let’s make an NSX backup check script, PowerShell and REST API to the rescue! … right?

So … no, you cannot get the backup status via REST API

Great.

But you can via the WebAPI!

Hurrah! Lets throw in some Invoke-WebRequest and get the data we need.

After some basic checks, I got the info I wanted – now I need to schedule it and have it run a short period after the backup window.

This part resulted in a path of trying to figure out a way to hold account passwords in a usable manner without them being written in clear-text anywhere because that’s just no good. There are a few different ways to do this, but they either tie it to one user profile and computer, or don’t work with the basic auth needed to run against NSX to get the data via webrequest. I will go into how I achieved that further down, but first, the web API to get backup status.

Interrogating NSX Web API

After some looking around, I discovered the following URL called via Invoke-WebRequest would give us the backup results:

Invoke-WebRequest -Uri https://[nsxmgr]/api/v1/cluster/backups/overview -Headers $Header 

Now the big problem with Invoke-WebRequest is that you would have assumed that it would return any response status such as 403 Forbidden. Nope!

You don’t get any helpful error catching, it either works or bombs out. Not much good for an unattended script that you want to tell you about any issues.

So the best fix I came up with was using a try and catch

try { 
    $result = Invoke-WebRequest -Uri https://...
    }
catch {catchFailure}

I then created a function to run in the event of the failure which will ping the host to see if it’s online and if it is output the error, if it isn’t output that the host is unreachable.

if (Test-Connection -BufferSize 32 -Count 1 -ComputerName $nsxmgr -Quiet) {
        <error output>
    } else { <host offline output> } exit

Job jobbed, no more bombing out with red text.

Dealing with certificates

When you run Invoke-WebRequest against an NSX manager with self signed certificates you get the error "The Underlying connection was closed: Could not establish trust relationship for the SSL/TLS secure channel"

The fix for this is to add in this code near the top of your script to resolve the error.

add-type @"
   using System.Net;
   using System.Security.Cryptography.X509Certificates;
   public class TrustAllCertsPolicy : ICertificatePolicy {
      public bool CheckValidationResult(
      ServicePoint srvPoint, X509Certificate certificate,
      WebRequest request, int certificateProblem) {
      return true;
   }
}
"@
[System.Net.ServicePointManager]::CertificatePolicy = New-Object TrustAllCertsPolicy

Password Management

Great stuff I now have a working Script, but ideally, I want it to be scheduled and unattended.

This is where I spun around for a while trying different ways to store credentials in a secure format, because passwords in plain text is uncool.

I initially was trying to use the encoded credentials modules but having little luck getting it passed as a header value, so bugged a colleague (@pauldavey_79) for some help and ideas from his many years of experience prodding APIs.

What we came up with was to take the username and password as an requested input via Read-Host and encode it in the Base 64 format required to pass via the header in Invoke-WebRequest and store that in a text file.

[System.Runtime.InteropServices.Marshal]::PtrToStringAuto([System.Runtime.InteropServices.Marshal]::SecureStringToBSTR($pass))
    $userpass  = $username + ":" + $password

    $bytes= [System.Text.Encoding]::UTF8.GetBytes($userpass)
    $encodedlogin=[Convert]::ToBase64String($bytes)
    
    Set-Content -Path $credPath -Value $encodedlogin

This worked a charm.

Handling the Outputs.

With this script I wanted to feed the output into a syslog server (vRealize Log Insight in this case) which would then send emails to the appropriate places and allow for a nice dashboard for quick whole estate checks.

In order to achieve this, I used the Add-Content command to append the data to a .log file which was monitored by the Log Insight Agent and sent off to the Log Insight Server.

if($LatestBackup.success -eq $true){ 
  Add-Content -Path $exportpath -Value "$timestamp [INFO] $NSXMGR - Last backup successful. Start time $start End time $end"
} else{ 
  Add-Content -Path $exportpath -Value "$timestamp [ERROR] $NSXMGR - Last backup failed $start $end"

This gives us a nice syslog formatted output which can be easily manipulated within Log Insight. Hurrah.

One thing to note is that the NSX WebAPI returned the start and end times in the usual unix format, so I needed to convert that to a more suitable human readable date, that was done with the line:

 $var = (get-date 01.01.1970).AddSeconds([int]($LatestBackup.end_time/1000))

I also needed to get my try-catch error collector to output the error messages in the same format so that was done as so:

Add-Content -Path $exportpath -Value "$timestamp [ERROR] $NSXMGR - $_"

Pulling all of that together we get the final script which can be used as a skeleton for any future work required. A few of them will be posted at a later date.

The Final NSX Backup Check Script

I have put all the variables at the top and the script is designed to be run in a folder and to have another separate folder with the logs. This was done in order to manage multiple scripts logging to the same location
eg:
c:\scripts\NSXBackupCheck\NSXBackupCheck.ps1
c:\scripts\Logs\NSXBackupCheck.log

param ($nsxmgr)

$curDir = &{$MyInvocation.PSScriptRoot}
$exportpath = "$curDir\..\Logs\NSXBackupCheck.log"
$credPath = "$curDir\$nsxmgr.cred"
$scriptName = &{$MyInvocation.ScriptName}

add-type @"
   using System.Net;
   using System.Security.Cryptography.X509Certificates;
   public class TrustAllCertsPolicy : ICertificatePolicy {
      public bool CheckValidationResult(
      ServicePoint srvPoint, X509Certificate certificate,
      WebRequest request, int certificateProblem) {
      return true;
   }
}
"@
[System.Net.ServicePointManager]::CertificatePolicy = New-Object TrustAllCertsPolicy

function catchFailure {
    $timestamp = (Get-Date).ToString("yyyy/MM/dd HH:mm:ss")
    if (Test-Connection -BufferSize 32 -Count 1 -ComputerName $nsxmgr -Quiet) {
        Add-Content -Path $exportpath -Value "$timestamp [ERROR] $NSXMGR - $_"
    }
    else {
        Add-Content -Path $exportpath -Value "$timestamp [ERROR] $NSXMGR - Host Not Found"
    }
exit
}

if (!$nsxmgr) {
    Write-Host "please provide parameter 'nsxmgr' in the format '$scriptName -nsxmgr [FQDN of NSX Manager]'"
    exit
    }

if (-Not(Test-Path -Path  $credPath)) {
    $username = Read-Host "Enter username for NSX Manager" 
    $pass = Read-Host "Enter password" -AsSecureString 
    $password = [System.Runtime.InteropServices.Marshal]::PtrToStringAuto([System.Runtime.InteropServices.Marshal]::SecureStringToBSTR($pass))
    $userpass  = $username + ":" + $password

    $bytes= [System.Text.Encoding]::UTF8.GetBytes($userpass)
    $encodedlogin=[Convert]::ToBase64String($bytes)
    
    Set-Content -Path $credPath -Value $encodedlogin
}

$encodedlogin = Get-Content -Path $credPath

$authheader = "Basic " + $encodedlogin
$header = New-Object "System.Collections.Generic.Dictionary[[String],[String]]"
$header.Add("Authorization",$authheader)

try{
    $result = Invoke-WebRequest -Uri https://$nsxmgr/api/v1/cluster/backups/overview -Headers $Header -UseBasicParsing
    if($result.StatusCode -eq 200) {
        $nsxbackups = $result.Content | ConvertFrom-Json
        $LatestBackup = $nsxbackups.backup_operation_history.cluster_backup_statuses
        $start = (get-date 01.01.1970).AddSeconds([int]($LatestBackup.start_time/1000))
        $end = (get-date 01.01.1970).AddSeconds([int]($LatestBackup.end_time/1000))
        $timestamp = (Get-Date).ToString("yyyy/MM/dd HH:mm:ss")
        if($LatestBackup.success -eq $true){ 
            Add-Content -Path $exportpath -Value "$timestamp [INFO] $NSXMGR - Last backup successful. Start time $start End time $end"
        } else{ 
            Add-Content -Path $exportpath -Value "$timestamp [ERROR] $NSXMGR - Last backup failed $start $end"
        }
    }
 }
catch {catchFailure}

Overview

The final script above can be altered to be used as a skeleton for any other Invoke-WebRequest APIs as well as simply being adapted for REST API. I will be following up this post with further updates to this script using RESTAPI and also an adaption to use PowerCLI which required a different credential store.

The REST API Script can be found here: NSX Alarm Check Script

VMware NSX Manager Login with Local Account

NSX Manager to login with a local account

My client has an NSX environment deployed with integration with VMware Workspace One, which works great most of the time, but sometimes you will need to get NSX Manager to login with a local account, such as when WS1 is playing up. How is this possible?

To force the NSX Manager to login with a local account, provide this specific URL:

https://[NSXManagerFQDN]/login.jsp?local=true

Horizon 2206 fails to connect to SQL Server – An error occurred while attempting to configure the database.

I’ve just come across a new issue where the latest release of Horizon fails to connect to an SQL Server to configure the Event Database. The only error message you get is “An error occurred while attempting to configure the database. Double check the database parameters and ensure that the database is not down, restarting, or otherwise unavailable. “

An error occurred while attempting to configure the database.

This problem is caused by Horizon dropping support for certificate signature algorithms including SHA1 and SHA512.

Finding the cause of an error occurred while attempting to configure the database.

To confirm this is the problem you are experiencing, lets check in the Connection Server debug log stored in the following location on your Connection Server:

C:\ProgramData\VMware\VDM\logs\ debug-[year]-[month]-[timestamp].txt

For confirmation that this is the issue you are facing, you are looking for the keyphrase “DATABASE_CONNECTION_FAILED#” which shows that “Certificates do not conform to algorithm constraints.” 

ERROR (1EF4-23E0) <ajp-nio-127.0.0.1-8009-exec-8> [FaultUtilBase] InvalidRequest: {#DATABASE_CONNECTION_FAILED#} Unable to update database settings; database connection failed: SQL exception when connecting to database: The driver could not establish a secure connection to SQL Server by using Secure Sockets Layer (SSL) encryption. Error: "Certificates do not conform to algorithm constraints". ClientConnectionId:xxxx
ERROR (1EF4-23E0) <ajp-nio-127.0.0.1-8009-exec-8> [RestApiServlet] Unexpected fault:(vdi.fault.InvalidRequest) {
   errorMessage = {#DATABASE_CONNECTION_FAILED#} Unable to update database settings; database connection failed: SQL exception when connecting to database: The driver could not establish a secure connection to SQL Server by using Secure Sockets Layer (SSL) encryption. Error: "Certificates do not conform to algorithm constraints". ClientConnectionId:xxxx
} for uri /view-vlsi/rest/v1/EventDatabase/update

Unfortunately this does not tell us about what certificate algorithm is being used by the SQL server.

The Database Server being used for the Event Database is using Windows Server 2016 and SQL Server 2016. The DBA had not configured an SSL certificate against the database, or the SQL Server as a whole, so without full access to confirm, we worked on the assumption that had a default self signed certificate from when it was originally installed and this was likely SHA1.

To fix this we need to add these certificate signature algorithms to the override in the Horizon ADAM database.

You can find details about connecting to the ADAM Database on VMware KB2012377

Connect to the Horizon ADAM Database

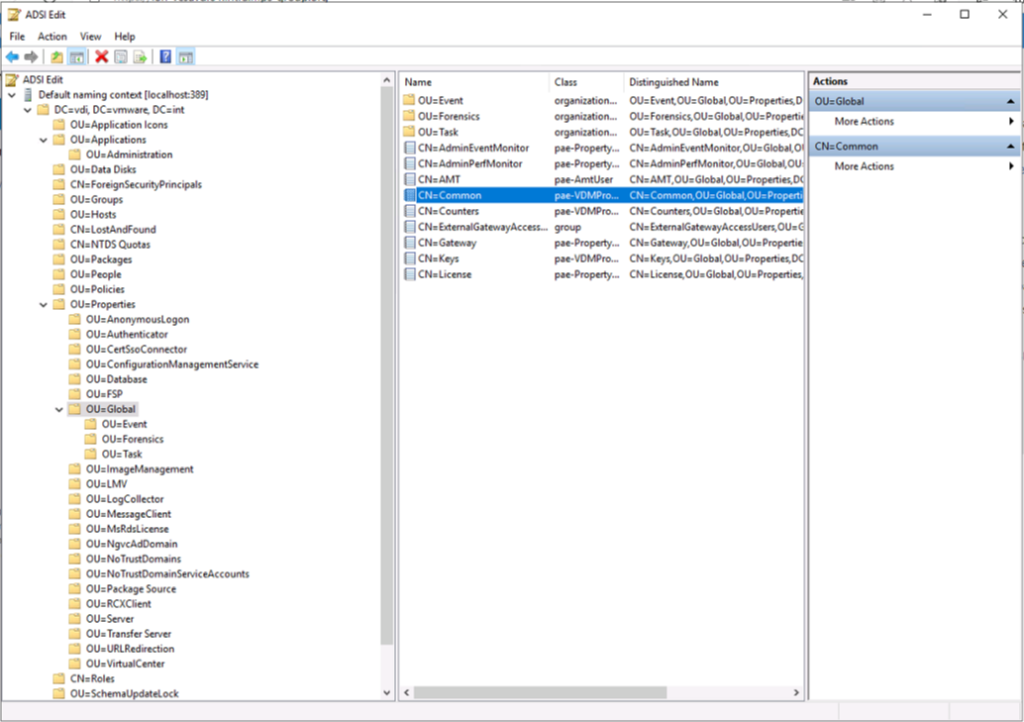
  1. Start the ADSI Edit utility on your Horizon Connection Server.
  2. In the console tree, select Connect to.
  3. In the Select or type a Distinguished Name or Naming Context text box, type the distinguished name DC=vdi, DC=vmware, DC=int
  4. In the Select or type a domain or server text box, select or type localhost:389 or the fully qualified domain name (FQDN) of the View Connection Server computer followed by port 389.
  5. Click OK.
  6. Select and expand DC=vdi,dc=vmware,dc=int to expand.
  7. Go to ou=properties then ou=global and go to properties on cn=common
  1. Find the LDAP attribute pae-SSLServerSignatureSchemes and add the following entry: \LIST:rsa_pkcs1_sha256,rsa_pkcs1_sha384,rsa_pkcs1_sha1
  2. Find the LDAP attribute pae-SSLClientSignatureSchemes and add the following entry: \LIST:rsa_pkcs1_sha256,rsa_pkcs1_sha384,rsa_pkcs1_sha1
    • IMPORTANT: The new list must include at least rsa_pkcs1_sha256 and rsa_pkcs1_sha384 to avoid breaking other outgoing connections.
    • In my example below I have needed to add SHA512withRSA as well as SHA1 for my vCenter Connection.
  1. Restart the Connection server service on all brokers in the cluster.
  2. Configure your Event Configuration as required and you should no longer receive the “An error occurred while attempting to configure the database.” error message and you will start recording events.

References

For reference, the default list of schemes is as follows:

rsa_pss_rsae_sha384
rsa_pss_rsae_sha256
rsa_pss_pss_sha384
rsa_pss_pss_sha256
rsa_pkcs1_sha384
rsa_pkcs1_sha256

If you require SHA1 you need to add

rsa_pkcs1_sha1,rsa_pss_rsae_sha1,rsa_pss_pss_sha1

If you require SHA512 you need to add

rsa_pkcs1_sha512,rsa_pss_rsae_sha512,rsa_pss_pss_sha512

If you require both SHA1 for SQL and SHA512 for the vCenter connection, like I did, you need to add the following otherwise the vCenter connection will fail again.

rsa_pkcs1_sha1, rsa_pkcs1_sha512,rsa_pss_rsae_sha512,rsa_pss_pss_sha512

VMware have also depreciated other protocols and ciphers in Horizon

The following protocols and ciphers are disabled by default:

  • SSLv3
  • TLSv1 and TLSv1.1
  • RC4

NOTE: It is not possible to enable support for ECDSA certificates. These certificates have never been supported.

Further details of these are HERE

Horizon 2206 fails to connect to the vCenter: Certificate validation failed

I’ve just come across a new issue where the latest release of Horizon fails to connect to the vCenter. The only error message you get is “Certificate validation failed”

This problem is caused by Horizon dropping support for certificate signature algorithms including SHA512withRSA

Finding the cause of Certificate validation failed

To confirm this is the problem you are experiencing, lets check in the Connection Server debug log stored in the following location on your Connection Server:

C:\ProgramData\VMware\VDM\logs\ debug-[year]-[month]-[timestamp].txt

For confirmation that this is the issue you are facing, you are looking for the keyphrase “SSLHandshakeException” which shows that “Certificates do not conform to algorithm constraints.” 

Caused by: javax.net.ssl.SSLHandshakeException: SSLHandshakeException invoking https://vcenter.vsphere.local:443/sdk: Certificates do not conform to algorithm constraints

Next we need to confirm which signature algorithm is being used by your vCenter’s certificate.

Caused by: java.security.cert.CertPathValidatorException: Algorithm constraints check failed on signature algorithm: SHA512withRSA

So we can see that it is failing on signature algorithm SHA512withRSA.

To fix this we need to add these certificate signature algorithms to the override in the Horizon ADAM database.

You can find details about connecting to the ADAM Database on VMware KB2012377

Connect to the Horizon ADAM Database

  1. Start the ADSI Edit utility on your Horizon Connection Server.
  2. In the console tree, select Connect to.
  3. In the Select or type a Distinguished Name or Naming Context text box, type the distinguished name DC=vdi, DC=vmware, DC=int
  4. In the Select or type a domain or server text box, select or type localhost:389 or the fully qualified domain name (FQDN) of the View Connection Server computer followed by port 389.
  5. Click OK.
  6. Select and expand DC=vdi,dc=vmware,dc=int to expand.
  7. Go to ou=properties then ou=global and go to properties on cn=common
  1. Find the LDAP attribute pae-SSLServerSignatureSchemes and add the following entry: \LIST:rsa_pkcs1_sha256,rsa_pkcs1_sha384,rsa_pkcs1_sha512,rsa_pss_rsae_sha512,rsa_pss_pss_sha512
  2. Find the LDAP attribute pae-SSLClientSignatureSchemes and add the following entry: \LIST:rsa_pkcs1_sha256,rsa_pkcs1_sha384,rsa_pkcs1_sha512,rsa_pss_rsae_sha512,rsa_pss_pss_sha512
    • IMPORTANT: The new list must include at least rsa_pkcs1_sha256 and rsa_pkcs1_sha384 to avoid breaking other outgoing connections.
  1. Restart the Connection server service on all brokers in the cluster.

References

For reference, the default list of schemes is as follows:

rsa_pss_rsae_sha384
rsa_pss_rsae_sha256
rsa_pss_pss_sha384
rsa_pss_pss_sha256
rsa_pkcs1_sha384
rsa_pkcs1_sha256

If you require SHA1 you need to add

rsa_pkcs1_sha1,rsa_pss_rsae_sha1,rsa_pss_pss_sha1

If you require SHA512 you need to add

rsa_pkcs1_sha512,rsa_pss_rsae_sha512,rsa_pss_pss_sha512

VMware have also depreciated other protocols and ciphers in Horizon

The following protocols and ciphers are disabled by default:

  • SSLv3
  • TLSv1 and TLSv1.1
  • RC4

NOTE: It is not possible to enable support for ECDSA certificates. These certificates have never been supported.

Further details of these are HERE

Extending a Hard Drive Partition on Ubuntu Linux Virtual Machine

I needed to add some storage on a shell only Ubuntu Linux VM and due to having more experience with RedHat and via GUIs along with there being little information out there I thought it would be worth putting up a post for posterity.

So first step lets shut down and increase the VMDK

First Step Shut Down Guest OS

Now lets edit the VM settings

In the settings lets increase Hard Disk 1 on this VM

Lets go ahead and turn on the VM again and then we can SSH into the VM once it is back online.

(you could also take a snapshot at this point just in case)

Now onto the in-guest re partitioning bit.

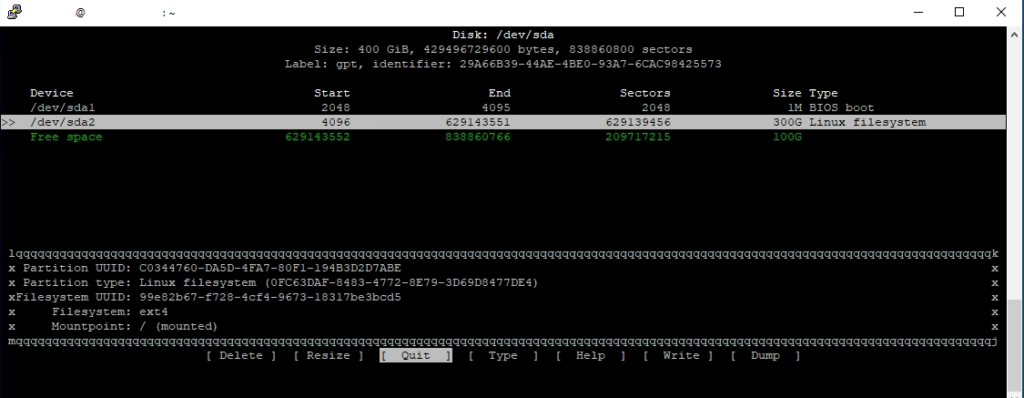
First lets resize sda2 to use the extra space. On Ubuntu this is done using the command

sudo cfdisk

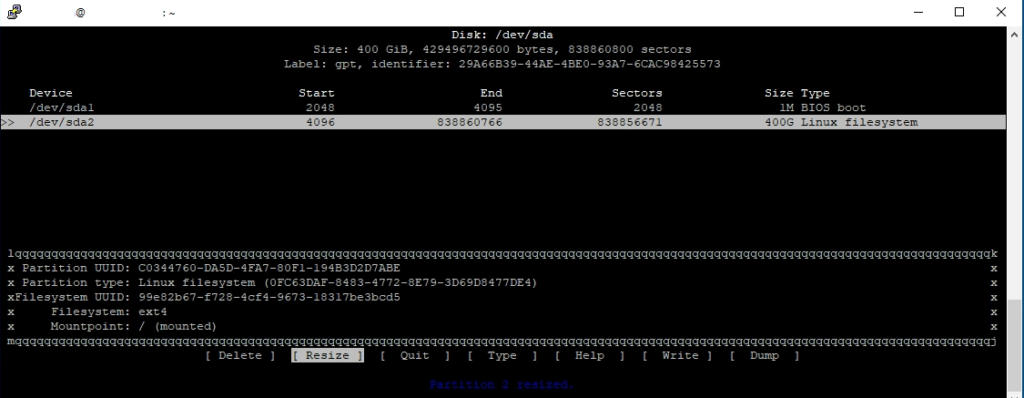
in here we select sda2 and then select [ Resize ] and enter the new desired size. By default it will suggest using all available space

Once this is done you will see the new size, and from here you need to [ Write ] the change and type “yes”

Now you can go ahead and [ Quit ] cfdisk

Here is another difference with RedHat, we must now run

sudo resize2fs /dev/sda2

If you run df -h you will see that /dev/sda2 is now using the increased size

And we are done. If you took a snapshot don’t forget to go ahead and remove it.

Flapping Alerts in vRealize Operations 8.x

Flapping vRealize Operations Alerts

I have just discovered this bug care of the tens of thousands of flapping alerts I’ve received in the last month.

Checking my federated vROps cluster to compile a report on the number of alerts generated over December I was greeted with a significantly higher number than I was expecting, especially considering the Christmas Change Freeze which would stop any non urgent tasks. Further investigation showed that it was due to a few dozen alert definition appearing thousands of times each (>6k alerts for one alert type on one cluster for example)

This appears to affect any alert based on receiving a fault symptom, such as all the default vSAN Management Pack Alerts for example.

This manifests itself as an alert going active, and then soon after cancelling, and then reactivating aka flapping. See below for an example for one cluster where the HCL DB wasn’t up to date.

And the cause of this bug is seen in the symptoms view on the object where it creates a new symptom every time instead of updating the existing fault symptom.

If you look at the “cancelled on” value, they were all showing active at the same time, and cancelled when the vSAN HCL DB was updated around 3:30pm on the 23th December. The 50 minute regularity seems to tie in with the vSAN Health Check interval on the vCenter.

I am running vROps 8.1.1 (16522874), but not sure whether this impacts all versions of vROps 8.x but if you see this on any other versions, let me know.

Luckily there is a fix, HF4 which will take you to vROps version 8.1.1 (17258327)

As this pak file is 2.2GB in size, I am unable to host it on my blog for easy download, so I suggest you speak to your VMware TAM, Account Manager, or open a case with Global Support Services and reference this hotfix.

If all else fails I might be able to share it with you using onedrive, however I cannot promise a quick turnaround for that.

UPDATE: I have had it confirmed that this bug affects 8.0 and 8.2 as well, and there are hotfixes for those versions too. The next full release will have the fix built in.

If you are currently on 8.0.x or 8.1.x I would suggest either applying the HF and then upgrading straight to 8.3 when it is released or upgrading to 8.2 first and then applying the HF.

Enabling Flash in 2021

Adobe Flash

If, like me, you have a lot of legacy systems which are reliant on Abode Flash for their management UIs (eg vSphere Client) then Flash being killed off is very inconvenient

Luckily there is currently a fix!

This works as of January 12th 2021, who knows if it will be killed off.

This requires the creation of a file in the data directory of your browser

Google Chrome

To enable Flash in Chrome you need to create a file and provide it with some custom config.

Browse to your user’s local appdata directory ( %localappdata% can be used if it’s configured)

Within in browse to \Google\Chrome\User Data\Default\Pepper Data\Shockwave Flash\

Create a new Folder called “System” and within here create a new file called mms.cfg

edit this file in notepad (other text editing programs are available) and enter the following text:

EOLUninstallDisable=1
EnableAllowList=1
AllowListPreview=1
AllowListUrlPattern=https://*.internaldomain.com

Replacing with your internal domain name to enable Flash on all your internal systems.

Microsoft Edge

As above, but this time your directory is

%localappdata%\Microsoft\Edge\User Data\Default\Pepper Data\Shockwave Flash\System\mms.cfg

Windows Internet Explorer

As above, but this time your directory is

%windir%\SysWOW64\Macromed\Flash\mms.cfg

Brave Browser

As above, but this time your directory is

%localappdata%\BraveSoftware\Brave-Browser\User Data\Default\Pepper Data\Shockwave Flash\System\mms.cfg

Troubleshooting vRealize Operations Networking

vRealize Operations

One of the first steps when troubleshooting vROps is to ensure that the correct ports are open.

This is best done via SSH, so first of all, enable that via the admin screen and log in as root (you did set a root password didn’t you? If not go do that now via the vSphere Console)

Port Checking

echo -e "\e[4;1;37mNode Connectivity Check..\e[0m"; for port in {80,123,443,6061} {10000..10010} {20000..20010}; do (echo >/dev/tcp/OTHERNODE_IPADDRESS/$port) > /dev/null 2>&1 && echo -e "\e[1;32mport $port connectivity test successful\e[0m" || echo -e "\e[1;31mport $port connectivity test failure\e[0m";done

copy and paste the above, changing the endpoint IP Address, to get a nice simple output for the usual ports required between the nodes.

Full details of the ports and directions below:

https://ports.vmware.com/home/vRealize-Operations-Manager

If you want to test a single port you can use curl

curl -v telnet://OTHERNODE_IPADDRESS:443

Latency Checking

grep clusterMembership /storage/db/casa/webapp/hsqldb/casa.db.script | sed -n 1'p' | tr ',' '\n' | grep ip_address | cut -d ':' -f 2 | sed 's/\"//g' | while read nodeip; do echo -n "$nodeip avg latency: " && ping -c 10 -i 0.2 $nodeip | grep rtt | cut -d '/' -f 5; done

This command will collect the names of all the nodes in the cluster and ping them, outputting the latency to each node

vCenter Connectivity Checking

echo -e "\e[1;31mvCENTER CONNECTIVITY:\e[0m" >> $HOSTNAME-status.txt;M0RE="y";while [ "$M0RE" == "y" ];do echo $MORE;while read -p 'Enter vCenter F_Q_D_N or I_P: ' F_Q_D_N && [[ -z "$F_Q_D_N" ]] ; do echo 'F_Q_D_N or I_P cannot be blank';done;curl -k https://$F_Q_D_N >> /dev/null;if [ "$?" == "0" ]; then echo $F_Q_D_N 'Connectivity Test Successful' >> $HOSTNAME-status.txt;else echo $F_Q_D_N 'Connectivity Test Failed' >> $HOSTNAME-status.txt;fi; nslookup $F_Q_D_N >> $HOSTNAME-status.txt; echo -n "Check M0RE y or n: " && read M0RE;done;

This command will ask for an input and then perform a connectivity test to the supplied vCenter

Addendum

If you need to quickly check if the adapters have been distributed to all the nodes, run the following command to check the plugins folder size

$VCOPS_BASE/user/plugins/inbound

du -h --max-depth=1

VMware Horizon View – Kiosk mode

How to setup Kiosk Mode

The setup of kiosk mode in VMware Horizon View requires the use of the command line tool vdmadmin.

Step 1: create a new organisational unit (OU) specific for kiosk users

This OU will contain all kiosk mode VDIs and all accounts that will have access to a kiosk mode VDI. Specific GPOs can be associated with this OU to lock down the VDI session.

Example: OU=kiosk,OU=vdi,DC=mydomain,DC=local

Step 2: create a new Active Directory Security group 

This security group will contain all accounts that will have access to a kiosk mode VDI

Example: sg_kioskMode

Step 3: create a new floating Desktop pool in VMware Horizon View

Add all the VDIs to the OU created in Step 1

Make sure to delete or refresh the VDI immediately at logoff

Entitle the group you created in step 2 to this desktop pool

Step 4: Set default values for the organisational unit (OU), password expiration, and group membership of clients in kiosk mode.

This is done by executing the vdmadmin command line utility. The vdmadmin utility is located at C:\Program Files\VMware\VMware View\Server\tools\bin of each VMware Horizon View Connection server and should be executed from a command line (as administrator) directly from a VMware Horizon View Connection server.

Example: vdmadmin -Q -clientauth -setdefaults -ou “OU=kiosk,OU=vdi,DC=mydomain,DC=local” -noexpirepassword -group sg_kioskMode

NOTE: if you aren’t using a security group use “-nogroup” instead

Step 5: Add accounts for clients in Kiosk mode

The VMware Horizon View Connection Server creates Active Directory user account and passwords for each client based on the client’s MAC address or client ID, which it uses to authenticate the client when connecting it to the View desktop.

The clientid parameter must be in the form <MAC-address>, cm-<MAC-address> or custom-<name> where <MAC-address> is of the form aa:cc:ff:aa-33-99

Example-1: vdmadmin -Q -clientauth -add -domain MYDOMAIN -clientid custom-kiosk01 -password “Secret_Password” -ou “OU=kiosk,OU=vdi,DC=mydomain,DC=local” -group sg_kioskMode -description “Kiosk 01” -noexpirepassword

Example-2:  vdmadmin -Q -clientauth -add -domain MYDOMAIN -clientid cm-00:50:56:82:81:ec -genpassword -ou “OU=kiosk,OU=vdi,DC=mydomain,DC=local” -group sg_kioskMode -description “Horizon View Kiosk account for client with MAC address 00:50:56:82:81:ec” -noexpirepassword

Step 6: Enable authentication of clients in kiosk mode for each View Connection Server instance

Example: vdmadmin -Q -enable -s MYCONNECTIONSERVER

Step 7: Setup clients to connect to the kiosk mode VDIs

Example when connecting via a specific username:

“C:\Program Files (x86)\VMware\VMware Horizon View Client\vmware-view.exe” -unattended -serverURL view.mydomain.local -userName custom-01 -password Secret_Password

Example when connecting via a specific endpoint who’s MAC address has been added as an account (Step 5):

“C:\Program Files (x86)\VMware\VMware Horizon View Client\vmware-view.exe” -unattended -serverURL view.mydomain.local

References

https://www.vmware.com/content/dam/digitalmarketing/vmware/en/pdf/whitepaper/vmware-view-kioskmode-white-paper-en.pdf

Estimate the equivalent number of VMs able to be reclaimed by rightsizing using vRealize Operations Supermetrics

When planning performing rightsizing events on a customer’s estate I am usually requested to estimate the number of new VMs which could be placed into estate on the resources freed up by rightsizing.

This can be calculated relatively easily by hand, but who wants to do that when you can have something else do it for you, and even utilise it on a dashboard as a KPI

My customer in this example have a guideline they use for an average machine on their estate which is 4 vCPU and 32GB RAM.

So in the first example I will show the code with a fixed VM size.

This calculation uses the floor function to take the lowest of an array of numbers. More details here:

Estimate remaining VM Overhead using vROps – Advanced Super Metrics

The calculations it’s using here are the number of excess vCPU metric, divided by 4 vCPU for our guideline VM, and the amount of excess memory metric, convert from KB to GB and divided by 32GB RAM

Remember the depth setting allowing this supermetric to run at a higher grouping level such as vCenter or Custom Group

floor(min([((sum(${adaptertype=VMWARE, objecttype=VirtualMachine, metric=summary|oversized|vcpus, depth=5}))/4),(((sum(${adaptertype=VMWARE, objecttype=VirtualMachine, metric=summary|oversized|memory, depth=5}))/1048576)/32)]))

Now this can be further expanded by instead of using a fixed VM size, we could take the average VM size of the grouping we are running this supermetric against.

To do this we would replace the “4” and “32” with a calculation for average size

For vCPU this would be

avg(${adaptertype=VMWARE, objecttype=VirtualMachine, metric=config|hardware|num_Cpu, depth=5}) 

for RAM this would be

avg((${adaptertype=VMWARE, objecttype=VirtualMachine, metric=config|hardware|memoryKB, depth=5})/1048576)

so our full calculation for estimating how many of the average VM size could be reclaimed by rightsizing would be:

floor(min([((sum(${adaptertype=VMWARE, objecttype=VirtualMachine, metric=summary|oversized|vcpus, depth=5}))/avg(${adaptertype=VMWARE, objecttype=VirtualMachine, metric=config|hardware|num_Cpu, depth=5})),(((sum(${adaptertype=VMWARE, objecttype=VirtualMachine, metric=summary|oversized|memory, depth=5}))/1048576)/avg((${adaptertype=VMWARE, objecttype=VirtualMachine, metric=config|hardware|memoryKB, depth=5})/1048576)
)]))

Sizing your migration using vRealize Operations and Supermetrics

Today I’m going to talk about using vRealize Operations and Supermetrics to size your requirements for migrating from one estate to another.

I have a customer with a large sprawling legacy vSphere estate and they are planning their migration to a new VCF deployment using HCX.

They could simply keep everything the same size and purchase the appropriate number of nodes, however in this case that could become very expensive very quickly.

Luckily we have been monitoring the legacy estate with vROps 7.0 and 8.1 for the last year.

With this in mind I created a supermetric which would calculated the total number of hosts required if all the VMs were conservatively rightsized, which would reduce their resource allocation by up to 50%, based on the vROps analystics calculations for recommended size along with removing any idle VMs which are no longer required.

This supermetric works to a depth of 5 deep, which means that we can get a required number of hosts for a cluster level as well as a whole vCenter or even a custom group of multiple vCenters.

In my example my new hosts have 40 cores which we are allowing to over-allocate by up to 4:1 giving a maximum of 160 vCPU per host, along with 1.5TB of RAM which is not going to be over allocated.

Step One – Memory

(ceil(((sum(${adaptertype=VMWARE, objecttype=ClusterComputeResource, metric=mem|memory_allocated_on_all_vms, depth=5}))-sum(${adaptertype=VMWARE, objecttype=ClusterComputeResource, metric=reclaimable|idle_vms|mem, depth=5})-sum(${adaptertype=VMWARE, objecttype=VirtualMachine, metric=summary|oversized|memory, depth=5}))/1574400000)+1)

This first calculation takes the total memory allocated on a cluster, removes the memory reclaimable from deleting idle VMs, and removes the total of memory able to be reclaimed by rightsizing the VMs.

This number is then divided by the amount of memory available in each host in kB

This number is then rounded up by using the CEIL function. More details on that here:

Estimate remaining VM Overhead using vROps – Advanced Super Metrics

Finally an additional host is added to this number to allow for N+1 High Availability. This can be set to your requirements.

Step Two – CPU

(ceil(((sum(${adaptertype=VMWARE, objecttype=ClusterComputeResource, metric=cpu|vcpus_allocated_on_all_vms, depth=5}))-sum(${adaptertype=VMWARE, objecttype=ClusterComputeResource,  metric=reclaimable|idle_vms|cpu, depth=5})-sum(${adaptertype=VMWARE, objecttype=VirtualMachine, metric=summary|oversized|vcpus, depth=5}))/(4*(40)))+1)

Similar to the memory calculation above, this takes the total number of vCPUs allocated on a cluster, removes the vCPUs able to be reclaimed from deleting idle VMs, and removes the total number of vCPUs able to be reclaimed by rightsizing the VMs.

This number is then divided by the number of cores available in each host multiplied by our maximum over-allocation of 4:1

Again this is rounded up using a CEIL function and then an additional host added for HA.

Step Three – Wrapping it up with a MAX function

This is the final super metric formula, which take the two calculations above and puts them into an array with the max function used to take the highest value to ensure we get the correct number of hosts.

This function has the following format:

max( [ calc1 , calc2 , … calcN ] )

You may spot that I have added a “3” as the third number, this is to ensure that the super metric never recommends a cluster size of less than three hosts.

max([(ceil(((sum(${adaptertype=VMWARE, objecttype=ClusterComputeResource, metric=mem|memory_allocated_on_all_vms, depth=5}))-sum(${adaptertype=VMWARE, objecttype=ClusterComputeResource, metric=reclaimable|idle_vms|mem, depth=5})-sum(${adaptertype=VMWARE, objecttype=VirtualMachine, metric=summary|oversized|memory, depth=5}))/1574400000)+1),(ceil(((sum(${adaptertype=VMWARE, objecttype=ClusterComputeResource, metric=cpu|vcpus_allocated_on_all_vms, depth=5}))-sum(${adaptertype=VMWARE, objecttype=ClusterComputeResource,  metric=reclaimable|idle_vms|cpu, depth=5})-sum(${adaptertype=VMWARE, objecttype=VirtualMachine, metric=summary|oversized|vcpus, depth=5}))/(4*(40)))+1),3])

IF Function in vROps Super Metrics aka Ternary Expressions

vRealize Operations. Using vROps Super Metric Ternary Expressions IF Function

Have you ever just wanted an IF Function when creating Super Metrics? Good news, there is one!

Leading on from the last post I did on determining the number of VMs which will fit into cluster, I have decided to further expand it with an IF function to take the Host Admission Policy failure to tolerate level into account as well.

Previously we used a flat 20% overhead as that was the company policy, however that reserved way too many resources on larger clusters, and setting it to a flat two host failures

We wanted to set any Cluster Compute Resource with less than 10 hosts, to only allow for a single host failure, but clusters of 10 and above should allow for two host failures.

In vROps terms this requires a Ternary Expression, or as most people know them, an IF Function.

You can use the ternary operator in an expression to run conditional expressions in the same way you would an IF Function.

This is done in the format:

expression_condition ? expression_if_true : expression_if_false.

So for our example we want to take the metric summary|total_number_hosts and check if the number of hosts is less than 10.

This means our expression condition is:

${this, metric=summary|total_number_hosts}<10

as we want to return a “1” for one host failure if this is true, and “2” for two host failures if it’s 10 or more our full expression is:

(${this, metric=summary|total_number_hosts}<10?1:2)

This means our full code is:

floor(min([(((((${this, metric=cpu|corecount_provisioned})-(((${this, metric=cpu|corecount_provisioned})/${this, metric=summary|total_number_hosts}))*(${this, metric=summary|total_number_hosts}<10?1:2))*4)-(${this, metric=cpu|vcpus_allocated_on_all_vms}))/8),(((((${this, metric=mem|host_provisioned})*((${this, metric=mem|host_provisioned}/${this, metric=summary|total_number_hosts})*(${this, metric=summary|total_number_hosts}<10?1:2)))-(${this, metric=mem|memory_allocated_on_all_vms, depth=1}))/1048576)/32),((((${this, metric=diskspace|total_capacity})*0.7-(${this, metric=diskspace|total_provisioned, depth=1}))/1.33)/(500+32))]))

VMware vExpert 2020

I’m proud to announce that I have been awarded vExpert for 2020. It’s a great honour to be recognised and receive these awards. The vExpert and vCommunity as a whole is extremely welcoming and helpful.

How to Build a PowerShell Menu GUI for your PowerShell Scripts

Purely for prosperity I have recreated this post from Nathan Kasco so I can find it better in future. Copyright Nathan Kasco. All the words and code is his.

It’s weekend project time again and today you will learn how to build a lightweight system tray context menu where you can quickly and easily launch your most coveted PowerShell scripts. You can see below the end result.

In this article, you’ll learn how to build your own PowerShell menu GUI by breaking the process down step-by-step.

Table of Contents

  • Environment and Knowledge Requirements
  • Show/Hide Console Window
  • Create Menu Options
  • Creating A Launcher Form
  • Show the Launcher Form

Environment and Knowledge Requirements

Before you dive in, please be sure you meet the following minimum requirements:

For this project, the good news is that you won’t really need to rely on Visual StudioPoshGUI, or any other UI development tool as the primary components that this project will rely on the following:

  • NotifyIcon – This will represent our customizable system tray icon for the user to interact with.
  • ContextMenu – Container for when the user right-clicks on the tray icon.
  • MenuItem – Individual objects for each option within the right-click menu.

Open up your favorite PowerShell script editor and let’s get started!

For this project you are going to build three functions: two functions to show/hide the console to provide a cleaner user experience and one to add items to your systray menu. These functions will serve as a foundation for later use to make your life much easier as you will learn a bit later in this article.

Show/Hide Console Window

Unless hidden, when you launch a PowerShell script, the familiar PowerShell console will come up. Since the menu items you’ll create will launch scripts, you should ensure the console doesn’t up. You just want it to execute.

When a script is executed, you can toggle the PowerShell console window showing or not using a little .NET.

First add the Window .NET type into the current session. To do this, you’ll use some C# as you’ll see below. The two methods you need to load into context are GetConsoleWindow and ShowWindow. By loading these DLLs into memory you are exposing certain parts of the API, this allows you to use them in the context of your PowerShell script:

 #Load dlls into context of the current console session
 Add-Type -Name Window -Namespace Console -MemberDefinition '
    [DllImport("Kernel32.dll")]
    public static extern IntPtr GetConsoleWindow();
 
    [DllImport("user32.dll")]
    public static extern bool ShowWindow(IntPtr hWnd, Int32 nCmdShow);
 '

Create two functions using the loaded above using the GetConsoleWindow() and ShowWindow() method as shown below.

 function Start-ShowConsole {
    $PSConsole = [Console.Window]::GetConsoleWindow()
    [Console.Window]::ShowWindow($PSConsole, 5)
 }
 
 function Start-HideConsole {
    $PSConsole = [Console.Window]::GetConsoleWindow()
    [Console.Window]::ShowWindow($PSConsole, 0)
 }

With these two functions you now have created a way in which you can show or hide the console window at will.

Note: If you’d like to see output from the scripts executed via the menu, you can use PowerShell transcripts or other text-based logging features. This allows you to maintain control versus only running the PowerShell session with the WindowStyle parameter to hide.

Now begin building script code by calling Start-HideConsole. When the menu-driven script executes, this will ensure the PowerShell console window doesn’t come up.

<# 
	Initialization of functions and objects loading into memory
	Display a text-based loading bar or Write-Progress to the host
#>
 
Start-HideConsole
 
<# 
	Code to display your form/systray icon
	This will hold the console here until closed
 #>

Create Menu Options

Now it’s time to create the menu options. Ensuring you can easily create new options later on, create another function this time called New-MenuItem. When you call this function, it will create a new MenuItem .NET object which you can then add to the menu later.

Each menu option will launch another script or exit the launcher. To accommodate for this functionality,  the New-MenuItem function has three parameters:

  • Text – The label the user will click on
  • MyScriptPath – The path to the PowerShell script to execute
  • ExitOnly – The option to exit the launcher.

Add the below function snippet to the menu script.

 function New-MenuItem{
     param(
         [string]
         $Text = "Placeholder Text",
 
         $MyScriptPath,
         
         [switch]
         $ExitOnly = $false
     )         

Continuing on building the New-MenuItem function, create a MenuItem object by assigning it to a variable.

 #Initialization
 $MenuItem = New-Object System.Windows.Forms.MenuItem

Next, assign the text label to the menu item.

 # Apply desired text
 if($Text) {
 	$MenuItem.Text = $Text
 }

Now add a custom property to the MenuItem called MyScriptPath. This path will be called upon when the item is clicked in the menu.

 #Apply click event logic
 if($MyScriptPath -and !$ExitOnly){
 	$MenuItem | Add-Member -Name MyScriptPath -Value $MyScriptPath -MemberType NoteProperty

Add a click event to the MenuItem that launches the desired script. Start-Process provides a clean way to do this within a try/catch block so that you can make sure any errors launching the script (such as PowerShell not being available or the script not existing at the provided path) fall to your catch block.

   $MenuItem.Add_Click({
        try{
            $MyScriptPath = $This.MyScriptPath #Used to find proper path during click event
            
            if(Test-Path $MyScriptPath){
                Start-Process -FilePath "C:\\Windows\\System32\\WindowsPowerShell\\v1.0\\powershell.exe" -ArgumentList "-NoProfile -NoLogo -ExecutionPolicy Bypass -File `"$MyScriptPath`"" -ErrorAction Stop
            } else {
                throw "Could not find at path: $MyScriptPath"
            }
        } catch {
          $Text = $This.Text
          [System.Windows.Forms.MessageBox]::Show("Failed to launch $Text`n`n$_") > $null
        }
  })

Sdd the remaining logic to provide an exit condition for the launcher followed by returning your newly created MenuItem back to be assigned to another variable at runtime.

    #Provide a way to exit the launcher
    if($ExitOnly -and !$MyScriptPath){
        $MenuItem.Add_Click({
            $Form.Close()
    
            #Handle any hung processes
            Stop-Process $PID
        })
    }
 
 	 #Return our new MenuItem
    $MenuItem
 }

You should now have the New-MenuItem function created! The final function should look like this:

  function New-MenuItem{
     param(
         [string]
         $Text = "Placeholder Text",
 
         $MyScriptPath,
         
         [switch]
         $ExitOnly = $false
     )
 
     #Initialization
     $MenuItem = New-Object System.Windows.Forms.MenuItem
 
     #Apply desired text
     if($Text){
         $MenuItem.Text = $Text
     }
 
     #Apply click event logic
     if($MyScriptPath -and !$ExitOnly){
         $MenuItem | Add-Member -Name MyScriptPath -Value $MyScriptPath -MemberType NoteProperty
     }
 
     $MenuItem.Add_Click({
             try{
                 $MyScriptPath = $This.MyScriptPath #Used to find proper path during click event
             
                 if(Test-Path $MyScriptPath){
                     Start-Process -FilePath "C:\\Windows\\System32\\WindowsPowerShell\\v1.0\\powershell.exe" -ArgumentList "-NoProfile -NoLogo -ExecutionPolicy Bypass -File `"$MyScriptPath`"" -ErrorAction Stop
                 } else {
                     throw "Could not find at path: $MyScriptPath"
                 }
             } catch {
                 $Text = $This.Text
                 [System.Windows.Forms.MessageBox]::Show("Failed to launch $Text`n`n$_") > $null
             }
         })
 
     #Provide a way to exit the launcher
     if($ExitOnly -and !$MyScriptPath){
         $MenuItem.Add_Click({
                 $Form.Close()
    
                 #Handle any hung processes
                 Stop-Process $PID
             })
     }
 
     #Return our new MenuItem
     $MenuItem
 }

Test the New-MenuItem function by copying and pasting the above code into your PowerShell console and running the function providing some fake parameter values. You’ll see that a .NET MenuItem object is returned.

 PS51> (New-MenuItem -Text "Test" -MyScriptPath "C:\\test.ps1").GetType()
 
 IsPublic IsSerial Name                                     BaseType
 -------- -------- ----                                     --------
 True     False    MenuItem                                 System.Windows.Forms.Menu

Creating A Launcher Form

Want more tips like this? Check out my personal PowerShell blog at: https://nkasco.com/FriendsOfATA

Now that you can easily create new menu items, it’s time to create a system tray launcher which will display the menu.

Create a basic form object to add components to. This doesn’t need to be anything fancy as it will be hidden to the end user and will keep the console running in the background as well.

 #Create Form to serve as a container for our components
 $Form = New-Object System.Windows.Forms.Form
 ​
 #Configure our form to be hidden
 $Form.BackColor = "Magenta" #Match this color to the TransparencyKey property for transparency to your form
 $Form.TransparencyKey = "Magenta"
 $Form.ShowInTaskbar = $false
 $Form.FormBorderStyle = "None"

Next, create the icon that will show up in the system tray. Below I’ve chosen to use the PowerShell icon. At runtime, the below code creates an actual system tray icon. This icon can be customized to your liking by setting the SystrayIcon variable to your desired icon.

Check out the documentation for the System.Drawing.Icon class to see other methods in which you can load an icon into memory.

 #Initialize/configure necessary components
 $SystrayLauncher = New-Object System.Windows.Forms.NotifyIcon
 $SystrayIcon = [System.Drawing.Icon]::ExtractAssociatedIcon("C:\\windows\\system32\\WindowsPowerShell\\v1.0\\powershell.exe")
 $SystrayLauncher.Icon = $SystrayIcon
 $SystrayLauncher.Text = "PowerShell Launcher"
 $SystrayLauncher.Visible = $true

When the script is run, you should then see a PowerShell icon show up in your system tray as you can see below.

Now, create a container for your menu items with a new ContextMenu object and create all of your menu items. For this example, the menu will have two scripts to run and an exit option.

 $ContextMenu = New-Object System.Windows.Forms.ContextMenu
 ​
 $LoggedOnUser = New-MenuItem -Text "Get Logged On User" -MyScriptPath "C:\\scripts\\GetLoggedOn.ps1"
 $RestartRemoteComputer = New-MenuItem -Text "Restart Remote PC" -MyScriptPath "C:\\scripts\\restartpc.ps1"
 $ExitLauncher = New-MenuItem -Text "Exit" -ExitOnly

Next, add all of the menu items just created to the context menu. This will ensure each menu option shows up in the form context menu.

 #Add menu items to context menu
 $ContextMenu.MenuItems.AddRange($LoggedOnUser)
 $ContextMenu.MenuItems.AddRange($RestartRemoteComputer)
 $ContextMenu.MenuItems.AddRange($ExitLauncher)
 ​
 #Add components to our form
 $SystrayLauncher.ContextMenu = $ContextMenu

Show the Launcher Form

Now that the form is complete, the last thing to do is to show it while ensuring the PowerShell console window doesn’t come up. Do this by using your Start-HideConsole , displaying the launcher form and then showing the console again withStart-ShowConsole to prevent a hung powershell.exe process.

#Launch
Start-HideConsole
$Form.ShowDialog() > $null
Start-ShowConsole

The full code in its entirety can be found here: https://github.com/nkasco/PSSystrayLauncher

or below as a text file. Please convert to ps1 to run

VMware Certified Professional – Digital Workspace (VCP-DW)

VCP-DW

Following on from obtaining VCAP-DTM, I’ve spent the last several months using my evenings to learn about VMware Airwatch to augment my vIDM knowledge. I am happy to say this has all paid off, and this weekend I have passed the exam for VMware Certified Professional – Digital Workspace (VCP-DW 2020)

I’ve used the old names here as everyone knows them, but for those that aren’t aware, late last year there was a few name changes to a number of the products.

Airwatch has been renamed to Workspace One Unified Endpoint Management (WS1 UEM)

As this will cause confusion with another EUC product called UEM…

VMware User Environment Manager, has been renamed to VMware Dynamic Environment Manager (DEM) …. although vRA still has a component called “DEM” …

and finally

VMware Identity Manager (vIDM) has been renamed to Workspace One Access. Which actually makes sense, since vIDM wasn’t a real Identity Manager, and caused a lot of confusion with new customers when trying to explain it’s role in the EUC stack. However it causes more confusion when it is deployed without an EUC stack, to use for authentication and SSO for vROps and vRLI.

For anyone wishing to attempt the VCP-DW I can confirm that it is not a simple exam, due to requiring knowledge of vIDM/WS1A, UAGs, Airwatch/WS1UEM, VMware Tunnel, Horizon integration, and managing Android, iOS and Windows 10 devices.

The starting place is with the VMware Exam Blueprint which will highlight all the areas you require to study and the Exam Prep Guide lists all the recommended reading.

As always, the ever helpful Kyran Brophy (EUC-Kiwi) has compiling a lot of the VCP-DW collateral and helpful websites together into one zip file which can be obtained from here: LINK

You must remember that he sat the exam in 2018 and a few areas of the VMware products have changed since then, not least the names, so grabbing newer versions of the product PDFs would be recommended as well.

Some additional recommended reading is listed below which was compiled by Michael Rebmann (Cloud13.ch)

Estimate remaining VM Overhead using vROps – Advanced Super Metrics

vRealize Operations. Using vROps to estimate remaining VM Overhead

I have a client using vROps 7 quite extensively, however they were still running a manual API Query to create a report on how many VMs of a certain size they could fit into their estate based on Allocation, which of course has been removed in 6.7 and 7.0. Running API Queries across their whole estate is a slow process, so they are interested in using vROps to estimate remaining VM overhead on a cluster.

Luckily this can be solved with a Super Metric.

First we need to calculate how many vCPU are available in total in the cluster, which is determined by the total number of cores multiplied by the overallocation ratio (4:1 here) and removing a buffer, in this case we are using 20% (80% remaining), but this can be set as the core count of one host if you prefer.

Then we remove the number of vCPUs that have been allocated to all the VMs.

Finally we divide by the number of vCPUs our template VM has. Two in this case.

(((((${this, metric=cpu|corecount_provisioned})*0.8)*4)-(${this, metric=cpu|vcpus_allocated_on_all_vms}))/2)

Next we need to determine the available RAM in total in the cluster, which is determined by the total RAM minus a buffer, again this can be equivalent to one host if prefered.

We then need to remove the RAM allocated to all the VMs.

Next we need to then divide this value by 1048576 to convert from KB to GB

And then we divide by the number of GB of RAM our VM has. We are using 4GB here.

((((${this, metric=mem|host_provisioned})*0.8-(${this, metric=mem|memory_allocated_on_all_vms, depth=1}))/1048576)/4)

For our last calculation, we need to determine the Storage by taking the total storage capacity, removing our buffer and removing the total usage. You could also use the total allocated if you don’t want to over provision storage. If you are using vSAN you can add in the vSAN replica storage as well. 2x for RAID1, 1.33x for Erasure Coding FTT=1 (AKA RAID5) and 1.5x for Erasure Coding FTT=2 (AKA RAID6). We are using RAID5 in this example.

We then divide this by either the size of the VMDK HDD or an average utilisation depending on your policy. We are using 80GB here for calculation purposes.

((((${this, metric=diskspace|total_capacity})*0.7-(${this, metric=diskspace|total_usage, depth=1}))/1.33)/80)

Now we have our three calculations we need to use some advanced Super Metric functions to chose the calculation with the lowest number, as that will be the driving factor on what will fit in the cluster.

This is done with the function “MIN” and feeding in an array

min([FormulaA,FormulaB,FormulaC])

Now we have the minimum number of VMs which will fit, we need to round down that number, because nobody cares that 67.432 VMs could fit in the cluster, they want to know that 67 VMs will fit. Luckily there is another function for that – “FLOOR”. This is similar to ROUNDDOWN in that it give you the whole value.

floor(formula) 

FYI “CEIL” is equivalent to ROUNDUP if you want the value to be rounded up.

Now we tie these all together to get our full calculation.

floor(min([(((((${this, metric=cpu|corecount_provisioned})*0.8)*4)-(${this, metric=cpu|vcpus_allocated_on_all_vms}))/2),((((${this, metric=mem|host_provisioned})*0.8-(${this, metric=mem|memory_allocated_on_all_vms, depth=1}))/1048576)/4),((((${this, metric=diskspace|total_capacity})*0.7-(${this, metric=diskspace|total_usage, depth=1}))/1.33)/80)]))

Now clone this to estimate remaining VM Overhead for each T-Shirt size you offer.

Update March 2020

I have further updated this super metric to use total provisioned for the storage when in use with vSAN or other thin provisioned datastores as well as also taking Swap size into account, and changed the overhead from a flat 20% to the equivalent of two hosts.

This section will take the total core count, and then remove the total core count divided by the number of hosts and multiply by the number of host failures to allow in a cluster (2 in this case), and then multiply by the vCPU to Core overallocation ratio (4:1 in this case).

(((${this, metric=cpu|corecount_provisioned})-(((${this, metric=cpu|corecount_provisioned})/${this, metric=summary|total_number_hosts}))*2)*4)

As before we then remove the total number of vCPUs allocated on all VMs and divide by the number of vCPUs in your VM.

I have done the same calculation for RAM as well

((((${this, metric=mem|host_provisioned})*((${this, metric=mem|host_provisioned}/${this, metric=summary|total_number_hosts})*2))

For storage I have changed to using the metric “diskspace|total_provisioned” instead of “diskspace|total_used” and added the memory size on top of the HDD size (500GB HDD plus 32GB Swap)

((((${this, metric=diskspace|total_capacity})*0.7-(${this, metric=diskspace|total_provisioned, depth=1}))/1.33)/(500+32))

This is the final super metric for all compute metrics.

floor(min([(((((${this, metric=cpu|corecount_provisioned})-(((${this, metric=cpu|corecount_provisioned})/${this, metric=summary|total_number_hosts}))*2)*4)-(${this, metric=cpu|vcpus_allocated_on_all_vms}))/8),(((((${this, metric=mem|host_provisioned})*((${this, metric=mem|host_provisioned}/${this, metric=summary|total_number_hosts})*2))-(${this, metric=mem|memory_allocated_on_all_vms, depth=1}))/1048576)/32),((((${this, metric=diskspace|total_capacity})*0.7-(${this, metric=diskspace|total_provisioned, depth=1}))/1.33)/(500+32))]))

This code is also submitted to VMware {code} Sample Exchange

https://code.vmware.com/samples/6996/estimate-remaining-vm-overhead-using-vrealize-operations#

Update Part Deux

I have further refined this Super Metric to account for different cluster sizes. Details are here:

Now it will allow you to have a hosts to failure of one host in clusters under 10 hosts, and two hosts to fail in clusters of 10 or more

The updated code is:

floor(min([(((((${this, metric=cpu|corecount_provisioned})-(((${this, metric=cpu|corecount_provisioned})/${this, metric=summary|total_number_hosts}))*(${this, metric=summary|total_number_hosts}<10?1:2))*4)-(${this, metric=cpu|vcpus_allocated_on_all_vms}))/8),(((((${this, metric=mem|host_provisioned})*((${this, metric=mem|host_provisioned}/${this, metric=summary|total_number_hosts})*(${this, metric=summary|total_number_hosts}<10?1:2)))-(${this, metric=mem|memory_allocated_on_all_vms, depth=1}))/1048576)/32),((((${this, metric=diskspace|total_capacity})*0.7-(${this, metric=diskspace|total_provisioned, depth=1}))/1.33)/(500+32))]))

Load Balanced VMware Workspace One Network Identification

Load Balanced VMware Workspace One Network Identification

I recently had a customer who wanted to make certain users on their network use Multi Factor Authentication, but not others.

Users connect to a Netscalar load balancer for the two UAG applicances, which then reverse proxy the WorkspaceOne Identity Manager (vIDM aka WSOne Access) cluster via another Netscalar load balancer.

The problem is that even if you configure the Loadbalancer to pass the client source IP as a X-Forwarded-For header, vIDM does not recognise which of the IPs listed is the client’s actual IP and will usually use the wrong IP, bypassing the Network Range policy rules. What we want is to ignore certain IPs in the XFF header.

The fix for this is to tell vIDM all of the IPs that you want to ignore and disregard. This list would be the IP of every Loadbalancer and UAG appliance on the route from your client to the vIDM instance.

First step is to follow your Load Balancer vendor’s guide to enable client ip X-Forwarded-For URL rewrite. Carl Stalhood has thankfully done one for how to configure Netscaler here: https://www.carlstalhood.com/vmware-horizon-unified-access-gateway-load-balancing-netscaler-12/

Next we need to add our IPs to each vIDM appliance in the runtime-confile.properties file. In my case I have six of them so this took the best part of an hour waiting for everything to come back up. When restarting vIDM services you MUST ensure that they are fully up on the node before progressing to the next node. This can be monitored from the Admin System Diagnostics Dashboard. Wait for all the green ticks unless you want to spend a few hours cleaning up unassigned shards (see HERE for how to fix that)

Via SSH/Console connect to each vIDM appliance and run the following commands to make a copy of the original file and open it for editing:

cd /usr/local/horizon/conf/
cp runtime-config.properties runtime-config.properties.bak
vi runtime-config.properties

Scroll to the end of the document, hit the [Insert] Key on your keyboard to put vi into edit mode and add the following line to the very end of the file:

service.ipsToIgnoreInXffHeader=X.X.X.X,Y.Y.Y.Y/26

Where X.X.X.X is a specific IP you wish to ignore, and Y.Y.Y.Y/26 is a specific Subnet you wish to ignore.

Now restart the service

service horizon-workspace restart

and now browse to the System Diagnostics Dashboard on the admin interface and wait for the services to come back up before moving on to the next node.

Congratulations, WorkspaceOne can now identify users by their actual client IP.

Script to Add Custom Icons to a Horizon Application

Script to add icon to horizon application

Quick way to get a list of icons:

Get-HVApplication | Select-Object name,displayname |Export-Csv -path C:\HVIcons\newlist.csv

I wrote the following script to take a csv file of application name and description, and then connect to a Horizon Connection Server and cycle through the csv looking for an icon file in the format desc.png or desc-0.png and apply the icon to the application.

It is made up of three modules, one of which is a lightly modified version of a VMware staffer’s module, which included a load of “breaks” which I had to remove to ensure it would complete the full array.


############################################################
### Add Icons to Horizon Application from a CSV File
### .NOTES
###    Author                      : Chris Mitchell
###    Author email                : mitchellc@vmware.com
###    Version                     : 1.0
###
###    ===Tested Against Environment====
###    Horizon View Server Version : 7.7
###    PowerCLI Version            : PowerCLI 11.3
###    PowerShell Version          : 5.1
###
###    Add-HVAppIcon -h VCS01.local.net -csv apps.csv -u admin -p Password01
###
############################################################

param (
    [string]$h = $(Read-Host "Horizon Connection Server Name:"),
    [string]$c = $(Read-Host "csv filename:"),
    [string]$u = $(Read-Host "username:"),
    [string]$p = $(Read-Host "password:")
    )


function Get-ViewAPIService {
  param(
    [Parameter(Mandatory = $false)]
    $HvServer
  )
  if ($null -ne $hvServer) {
    if ($hvServer.GetType().name -ne 'ViewServerImpl') {
      $type = $hvServer.GetType().name
      Write-Error "Expected hvServer type is ViewServerImpl, but received: [$type]"
      return $null
    }
    elseif ($hvServer.IsConnected) {
      return $hvServer.ExtensionData
    }
  } elseif ($global:DefaultHVServers.Length -gt 0) {
     $hvServer = $global:DefaultHVServers[0]
     return $hvServer.ExtensionData
  }
  return $null
}


function HVApplicationIcon {
<#
.SYNOPSIS
   Used to create/update an icon association for a given application.

.DESCRIPTION
   This function is used to create an application icon and associate it with the given application. If the specified icon already exists in the LDAP, it will just updates the icon association to the application. Any of the existing customized icon association to the given application will be overwritten.

.PARAMETER ApplicationName
   Name of the application to which the association to be made.

.PARAMETER IconPath
   Path of the icon.

.PARAMETER HvServer
   View API service object of Connect-HVServer cmdlet.

.EXAMPLE
   Creating the icon I1 and associating with application A1. Same command is used for update icon also.
   Set-HVApplicationIcon -ApplicationName A1 -IconPath C:\I1.ico -HvServer $hvServer

.OUTPUTS
   None

.NOTES
    Author                      : Paramesh Oddepally.
    Author email                : poddepally@vmware.com
    Version                     : 1.1

    ===Tested Against Environment====
    Horizon View Server Version : 7.1
    PowerCLI Version            : PowerCLI 6.5.1
    PowerShell Version          : 5.0
#>

  [CmdletBinding(
    SupportsShouldProcess = $true,
    ConfirmImpact = 'High'
  )]

  param(
   [Parameter(Mandatory = $true)]
   [string] $ApplicationName,

   [Parameter(Mandatory = $true)]
   $IconPath,

   [Parameter(Mandatory = $false)]
   $HvServer = $null
  )

  begin {
    $services = Get-ViewAPIService -HvServer $HvServer
    if ($null -eq $services) {
      Write-Error "Could not retrieve ViewApi services from connection object."
      
    }
    Add-Type -AssemblyName System.Drawing
  }

  process {
	if (!(Test-Path $IconPath)) {
      Write-Error "File:[$IconPath] does not exist."
      
    }

    if ([IO.Path]::GetExtension($IconPath) -ne '.png') {
      Write-Error "Unsupported file format:[$IconPath]. Only PNG image files are supported."
      
    }

    try {
      $appInfo = Get-HVQueryResult -EntityType ApplicationInfo -Filter (Get-HVQueryFilter data.name -Eq $ApplicationName) -HvServer $HvServer
    } catch {
      # EntityNotFound, InsufficientPermission, InvalidArgument, InvalidType, UnexpectedFault
      Write-Error "Error in querying the ApplicationInfo for Application:[$ApplicationName] $_"
      
    }

    if ($null -eq $appInfo) {
      Write-Error "No application found with specified name:[$ApplicationName]."
      
    }

    $spec = New-Object VMware.Hv.ApplicationIconSpec
    $base = New-Object VMware.Hv.ApplicationIconBase

    try {
      $fileHash = Get-FileHash -Path $IconPath -Algorithm MD5
      $base.IconHash = $fileHash.Hash
      $base.Data = (Get-Content $iconPath -Encoding byte)
      $bitMap = [System.Drawing.Bitmap]::FromFile($iconPath)
      $base.Width = $bitMap.Width
      $base.Height = $bitMap.Height
      $base.IconSource = "broker"
      $base.Applications = @($appInfo.Id)
      $spec.ExecutionData = $base
    } catch {
      Write-Error "Error in reading the icon parameters: $_"
      
    }

    if ($base.Height -gt 256 -or $base.Width -gt 256) {
      Write-Error "Invalid image resolution. Maximum resolution for an icon should be 256*256."
      
    }

    $ApplicationIconHelper = New-Object VMware.Hv.ApplicationIconService
    try {
      $ApplicationIconId = $ApplicationIconHelper.ApplicationIcon_CreateAndAssociate($services, $spec)
    } catch {
        if ($_.Exception.InnerException.MethodFault.GetType().name.Equals('EntityAlreadyExists')) {
           # This icon is already part of LDAP and associated with some other application(s).
           # In this case, call updateAssociations
           $applicationIconId = $_.Exception.InnerException.MethodFault.Id
           Write-Host "Some application(s) already have an association for the specified icon."
           $ApplicationIconHelper.ApplicationIcon_UpdateAssociations($services, $applicationIconId, @($appInfo.Id))
           Write-Host "Successfully updated customized icon association for Application:[$ApplicationName]."
           
        }
        Write-Host "Error in associating customized icon for Application:[$ApplicationName] $_"
        
    }
    Write-Host "Successfully associated customized icon for Application:[$ApplicationName]."
  }

  end {
    [System.gc]::collect()
  }
}


Function AddIconToApp($a) {

    foreach($Item in $a)
    {
        $IconFile = $IconFolder+"\"+$Item.DisplayName+".png"
        if (!(Test-Path $IconFile)) { 
            $IconFile = $IconFolder+"\"+$Item.DisplayName+"-0.png"
        }
        Write-Host Trying $IconFile
        if (Test-Path $IconFile) { 
            Write-Host "Adding Icon to" $Item.DisplayName
            $ItemName = $Item.Name
            HVApplicationIcon -ApplicationName $ItemName -IconPath $IconFile -ErrorAction SilentlyContinue
        } else {
                Write-Host "File Doesn't Exist"
        }  
        
    }
}


$dir = Get-Location

$IconFolder = $dir.Path + "\png"


Connect-HVServer $h -u $u -p $p

$csv = Import-Csv .\$c

AddIconToApp $csv

Disconnect-HVServer -Server * -confirm:$false


Converting ICO to PNG for Adding Application Icons to a Horizon Application

Prior to Horizon 7.9, in order to add custom application icons to an Application launcher you are required to run a PowerCLI cmdlet:

Set-HVApplicationIcon -ApplicationName MyApp -IconPath "C:\MyIcons\MyApp.png

The important thing to note here is that it only accepts PNG files as input. However what if you only have a giant collection of ICO files you want to use.

That’s where I found myself with a few hundred icons which i needed to convert to PNG and remove the transparency setting it as white, so I wrote the following PowerShell Script to extract the bitmaps from the ico and then convert to PNG.

#Convert-ICO2PNG.ps1
$files = Get-ChildItem "C:\icotest" -Filter *.ico -file -Recurse | 
foreach-object {

$Source = $_.FullName
$test = [System.IO.Path]::GetDirectoryName($source)
$base= $_.BaseName+".png"
$basedir = $test+"\"+$base
Write-Host $basedir
Add-Type -AssemblyName system.drawing
$imageFormat = "System.Drawing.Imaging.ImageFormat" -as [type]
$image = [drawing.image]::FromFile($Source)

# Create a new image
$NewImage = [System.Drawing.Bitmap]::new($Image.Width,$Image.Height)
$NewImage.SetResolution($Image.HorizontalResolution,$Image.VerticalResolution)

# Add graphics based on the new image
$Graphics = [System.Drawing.Graphics]::FromImage($NewImage)
$Graphics.Clear([System.Drawing.Color]::White) # Set the color to white
$Graphics.DrawImageUnscaled($image,0,0) # Add the contents of $image

# Now save the $NewImage 
$NewImage.Save($basedir,$imageFormat::Png)}  

Now you’ve got your PNGs you can add them to your application. See here for a script on doing that: LINK

Double Achievement Day: VMware Advanced Architecture Course and vExpert Cloud Management 2019

I have spent the last two weeks completing the VMware Centre for Advanced Learning’s Advanced Architecture Course in La Defense in Paris.

They don’t announce individual scores but the lowest was 82 out of 100 and the highest 92, so everyone did extremely well and I am proud to have been part of this cohort. I’m especially proud of my Team SSRC (Source) made up of [S]urjit Randhawa, Hus[S]am Abbas, [R]aeed Aldawood all from VMware PSO METNA and myself for getting the third best solution presentation when we were up against VMware PreSales, VCDXs, VCDX panel members, and VMware Staff Architects

Team SSRC with VMware’s Principal Architect Carsten Schaefer making me feel short

Additionally I received the Best Partner award and Surj received the award for Value Added and Expertise

Me with Andrea Siviero VMware Principal Architect
Surjit with Mitesh Pancholy and TJ Vatsa both Principal Consulting Architects

The AAC is a course intended to:

Strengthen architectural & solution outcome skills in VMware Sr Consultants, Architects and Partners by establishing a baseline and model to interact with VMware Customers, leading the discovery, design and effectively communicate VMware solutions.

The Advanced Architecture Course is a very comprehensive program covering not just technical content across solutions; but it also includes presentation and business skills, our VMware IT Value Model and Digital Workspace Journey Model, solution design best practices, and internal and industry standard architectural methodologies.

If you are ever offered a chance to attend this course I can highly recommend it. But it’s not a course to be taken lightly. There was 32 hours of prerequisite training, as well as needing to learn a Case Study which would be used for the final Presentation, which is completed throughout the course. The course itself started at 8am every day and generally we did not finish the team work until at least 10pm most nights

Additionally, on the same day I passed the AAC, the VMware vExpert Cloud Management 2019 announcement has been released, and I have been recognised for community contributions in the cloud management space!

vROps Summary Tab Fault for Certain Objects

vROps

I recently came across a client using vROps 7.5 with a fault with the vROps Summary tab for individual objects. It was working fine for some objects but not others.

The fault they were suffering with resulted in the Summary tab not working for certain object types. It would either show a blank grey screen or it would automatically forwarded to the “Manage Dashboard” screen. If you added “/alerts” to the end of the URL you can get to the alerts tab and then click and access all the other tabs.

Although if you then click on the vROps Summary tab, it just shows a blank screen or forwards to Manage Dashboards again.

At first I thought it had to be some Licensing “feature” to annoy people who were breaking their allowed number of Licensed Objects, so applied a temporary 10k OSI Enterprise license and STILL had the issue.

Even taking the cluster offline and rebooting, and reinstalling Management Packs didn’t fix the issue.

I was scratching my head for two days trying to figure out why it was only affecting some object types, but thanks to a nudge from a colleague we discovered the problem.

Good news everyone, we fixed the vROps Summary tab fault!

The Summary Dashboards Summary Detail tabs were blank for these object types but set correctly for others.

The vROps Summary Tab Fix!

This annoying fault can be resolved using these steps: 

  1. Navigating to Dashboards
  2. Manage Dashboards
  3. Click the Cog Icon
  4. Manage Summary Dashboards
  5. Select adapter type associated with your Object Types ( vCenter Adapter in my case)
  6. Click on each of the items with blank ‘Detail Page’ entries
  7. Click the ‘Use Default’ button in the top left hand corner to re-add them to summary detail
  8. Save

Now go run and find a Virtual Machine and revel in the glow of a working Summary tab in details view.

I’ve not found this discussed anywhere else, so hopefully this will be useful for anyone else who has this issue.

Creating a Windows 10 Mandatory Profile

I’ve been doing some EUC projects lately and had a requirement to do a Mandatory profile. As there were a number of little bugs in the version I was capturing (Windows 10 64 bit 1803) I’m putting some of the answers here to keep them together for future use. These have been compiled from various sources including the fantastic James Rankin to whom I owe many thanks for discovering and sharing the most complex steps in this process.

I’ll start off with the workarounds and prerequisites, as there are a number of them, including the requirement to create an unattend.xml file for sysprep to copy over default profile which can then be exported to a mandatory profile.


Installing Windows ADK Setup fails

First off, the very annoying bug which causes the install of the Windows 10 Windows Assessment and Deployment Kit (ADK), which we will use later for creating the unattend.xml answer file, to fail and roll back with little information. This is overcome by running it with PSExec from SysInternals (HERE).

The Windows ADK can be downloaded HERE and installed on a machine where you will have access to the Windows 10 install.wim, this can either be on the Windows 10 profile capture VM, or just your normal machine.

First step, download PSExec, from the above, and extract it somewhere convenient (I used c:\psexec\). Then we need to copy the downloaded ADK into this folder.

Open a powershell window and change into your psexec folder and run the following command

.\PsExec.exe /sid powershell.exe

In the new powershell 1.0 window that opens, change into your psexec directory again and run the ADK installer

.\adksetup.exe

Now complete the installer as normal, but be amazed that it now doesn’t rollback and actually installed. Hurrar.

We only need to install the “Deployment Tools” option, so unselect everything else and install.


Convert Install.ESD to Install.WIM

If you’re not using Windows Enterprise, chances are the install.wim file isn’t in the DVD sources directory, but there is an install.esd. So how do you get the wim file needed for creating the unattend.xml answer file?

First things first, we need to copy the install.esd from <DVD>:\sources\install.esd to a read/write folder, the easiest is the root of c:\

Once we’ve got the esd file we need to run a dism command to find the correct image for our install and then extract that image from the esd into a wim

dism /Get-WimInfo /WimFile:install.esd

Take a note of the number which corresponds to your version, for example on my DVD Windows 10 Pro is Index “6”. Now we know which image, lets extract our wim

dism /export-image /SourceImageFile:install.esd /SourceIndex:6 /DestinationImageFile:install.wim /Compress:max /CheckIntegrity

If you receive an error, then change the /Compress variable from “max” to “fast”, “none” or “recovery”.


Creating the unattend.xml answer file

Now we can create the unattend.xml answer file I alluded to earlier, in order to tell sysprep what to do. 

Firstly run “Windows System Image Manager” which we installed as part of the ADK earlier. From the File menu, choose “New Answer File”. On the pop up messagebox click [Yes] and then point to the install.wim file we copied to our c:\ drive earlier. Click [Yes] to create a catalogue file.

In the bottom left “Components” section, right click on the item starting with “amd64_Microsoft-Windows_Shell-Setup” and select “Add Setting to Pass 4 specialize” which will add it to the “Answer File” section

Click on this heading under “Specialize” and set the CopyProfile property on the right-hand pane to “true”. Set any other options within the answer file you wish, however we only need this one.

Validate the answer file by selecting Tools –> Validate answer file, and then save it to the root of c:\ drive as “unattend.xml”

If you built this on another machine, now copy the file to the root of your capture VM.

If you have no network access, there is always the PowerCLI applet Copy-VMGuestFile. However this will require a local user account and VMTools installed so will not work in Audit Mode.

Now we’ve finished discussing prerequisites, lets go look at creating our new profile.

In case you have problems creating the unattend.xml this is a precanned one for Windows 10 1803 Enterprise. It may well work on other versions as well.

<?xml version="1.0" encoding="utf-8"?>
<unattend xmlns="urn:schemas-microsoft-com:unattend">
    <settings pass="specialize">
        <component name="Microsoft-Windows-Shell-Setup" processorArchitecture="amd64" publicKeyToken="31bf3856ad364e35" language="neutral" versionScope="nonSxS" xmlns:wcm="http://schemas.microsoft.com/WMIConfig/2002/State" xmlns:xsi="http://www.w3.org/2001/XMLSchema-instance">
            <CopyProfile>true</CopyProfile>
        </component>
    </settings>
    <cpi:offlineImage cpi:source="wim:c:/install.wim#Windows 10 Enterprise" xmlns:cpi="urn:schemas-microsoft-com:cpi" />
</unattend>

And this is one for Windows 10 1803 Pro

<?xml version="1.0" encoding="utf-8"?>
<unattend xmlns="urn:schemas-microsoft-com:unattend">
    <settings pass="specialize">
        <component name="Microsoft-Windows-Shell-Setup" processorArchitecture="amd64" publicKeyToken="31bf3856ad364e35" language="neutral" versionScope="nonSxS" xmlns:wcm="http://schemas.microsoft.com/WMIConfig/2002/State" xmlns:xsi="http://www.w3.org/2001/XMLSchema-instance">
            <CopyProfile>true</CopyProfile>
        </component>
    </settings>
    <cpi:offlineImage cpi:source="wim:c:/install.wim#Windows 10 Pro" xmlns:cpi="urn:schemas-microsoft-com:cpi" />
</unattend>

Creating a custom default profile 

Due to the changed way of capturing a mandatory profile in Windows 10, we are now required to create a custom default profile with which to generate our mandatory profile.

The first step is to deploy a new VM, install Windows 10 to the configuration point, and enter Audit Mode.

So when you get to the above screen after installing Windows 10 you need to hammer Ctrl + Shift + F3 which will log you in as Administrator in Audit Mode.

Cancel the sysprep dialog box and make any changes you want on a device or user level. You can remove the Universal Windows Platform (UWP) apps here as well, I created an article on this HERE. Typical user level changes are:

  • Setting the background image and branding
  • Changing Explorer to open “my PC” instead of “Quick Access”
  • Show file extensions
  • Create any desktop icons as required
  • Pin Taskbar items
  • Arrange and remove the Start tiles
  • Configure IE/Edge homepage

Once all this is done we need to export the Start tile layout

Export-StartLayout -Path $ENV:LOCALAPPDATA\Microsoft\Windows\Shell\LayoutModification.xml

If you haven’t already created the unattend.xml answer file, install the Windows ADK and create it now as above. If you’ve created it on another machine, copy it to the root of the c:\ drive

Once we’ve created the answer file and put it on the root of the capture VM, we need to run sysprep.

c:\windows\system32\sysprep\sysprep.exe /oobe /generalize /shutdown /unattend:c:\unattend.xml

If sysprep fails to run for any reason, check the log file, but the most likely culprit will be a UWP which was removed from one place but not the other. The log file will detail which one is causing the conflict.

Once complete the VM will shutdown with the new default profile.

Additionally we can shrink down this default profile using the following commands from a powershell or cmd window by restarting the VM, and either entering audit mode again or completing sysprep.

takeown /f c:\users\default\appdata\local\Microsoft\WindowsApps /r /a /d Y
icacls c:\users\default\appdata\local\Microsoft\WindowsApps /grant Administrators:F /T /C /L
get-childitem C:\Users\Default\AppData\LocalLow -force | foreach ($_) {remove-item $_.fullname -force -recurse -confirm:$false}
get-childitem C:\Users\Default\AppData\Local\Microsoft\Windows -exclude “Shell”,”WinX” -Force | foreach ($_) {remove-item $_.fullname -force -recurse -confirm:$false}
get-childitem C:\Users\Default\AppData\Local\Microsoft -exclude “Windows” -Force | foreach ($_) {remove-item $_.fullname -force -recurse -confirm:$false}
get-childitem C:\Users\Default\AppData\Local -exclude “Microsoft” -Force | foreach ($_) {remove-item $_.fullname -force -recurse -confirm:$false}
get-childitem C:\Users\Default\AppData\Roaming\Microsoft\Windows -exclude “Start Menu”,”SendTo” -Force | foreach ($_) {remove-item $_.fullname -force -recurse -confirm:$false}
get-childitem C:\Users\Default\AppData\Roaming\Microsoft -exclude “Windows” -Force | foreach ($_) {remove-item $_.fullname -force -recurse -confirm:$false}
get-childitem C:\Users\Default\AppData\Roaming -exclude “Microsoft” -Force | foreach ($_) {remove-item $_.fullname -force -recurse -confirm:$false}
Get-ChildItem c:\users\default -Filter “*.log*” -Force | Remove-Item -Force
Get-ChildItem c:\users\default -Filter “*.blf*” -Force | Remove-Item -Force
Get-ChildItem c:\users\default -Filter “*.REGTRANS-MS” -Force | Remove-Item -Force

We could leave this here which would be suitable for many VDI installs, however I will go on with the creation of the mandatory profile.


Creating a mandatory profile

Having completed all of the steps from above, log on to the VM as an administrative user.

Open the Advanced section of System settings (either from Control Panel, Win + Break or Right click on My PC and click Properties). Click on the Advanced tab, and click on Settings to get to the User Profiles dialogue.

  • Click on the Default Profile and click [Copy To].
  • Fill in the “Copy profile to” location with the folder where you would like to store the mandatory profile.
    • I store it on the root of the c:\ drive and call the folder “mandatory.v6” as 1803 has profile version 6
  • Check the “Mandatory profile” checkbox.
  • Click [Change] and add “Authenticated Users” into the Object field.
  • Click [OK] and the folder you have specified as a destination will be created.

Weirdly there is no success message and the window remains open after clicking [OK], so hit [Cancel] to exit the dialog box.


Bug Time!

So there’s a weird bug in at least this version I’m using (1803) where it doesn’t copy the ntuser.dat and .ini files into the new folder. Helpful. If this happens to you, just go ahead and copy these two files from c:\users\default into your new folder.


Set permissions on filesystem

Now we’ve got our mandatory profile, we need to check that the filesystem permissions are correct. The copy will have added “Authenticated Users” with Read and Execute permissions, but we also need to add the “All Application Packages” user with “Full Control” and ensure that the Administrators group owns the folder, along with all subfolders.

So add these permissions and set them to replace all child objects and press [OK]


Set permissions on Registry

We also need to set the same permissions for the Registry. So lets fire up regedit, click on the HKEY_USERS hive, go to File –> Load Hive and select the ntuser.dat file from our mandatory profile folder.

Give the hive a temporary name (this doesn’t affect anything) and the hive name will now show under HKEY_USERS.

  • Right-click on the root of the hive and select Permissions.
  • Modify the permissions to allow both “Authenticated Users” and “All Application Packages” to have “Full Control”
  • Click [OK] and [OK] again on the error that pops up.

Clean up the Registry

Now we can clean up the Registry to trim it down a bit.

  • Remove all references to the Administrator username from the Registry hive using Edit –>Find
  • Delete any Registry keys or values that you deem unnecessary. For example:
    • any Policies keys under HKCU\Software
    • HKCU\Software\Microsoft\Windows\CurrentVersion.
    • HKCU\Software\AppDataLow
    • Other people have managed to massively reduce the ntuser.dat by being ruthless. I will have to test how far we can go but feel free to follow their suggestions.

Once complete you must remember to unload the hive by selecting the hive name you chose and going to File –> Unload Hive

If you don’t do this, you will lock the profile meaning no one will be able to access it.

After unloading the hive there will be a number of new *.log* and *.blf files in the folder, these can be deleted.


Making it Mandatory

To make this profile “mandatory” we need to rename the ntuser.dat file to ntuser.man. Additionally you can rename the folder to mandatory.man.v6 to make it super-mandatory! This just means that a temporary profile will never be used.


Finally some Group Policy

Setting the mandatory profile in group policy requires us to set the following:

Computer Configuration –> Policies –> Administrative Templates –> System –> User Profiles

Set “Set roaming profile path for all users logging onto this computer” to the profile location but omit the .V6 extension.

In addition to applying the mandatory profile, we need to set one additional option, else you will suffer from a broken Start Menu.

Computer Configuration –> Administrative Templates –> Windows Components –> App Package Deployment

Set “Allow deployment operations in special profiles” to Enabled.

Don’t forget to enable loop back as well!

Computer Configuration –> Policies –> Administrative Templates –> System –> Group Policy –> Configure user Group Policy loopback processing mode.

And we’re done!

Registration failed: Log Insight Adaptor Object Missing

I recently came across a problem at a client’s with integrating Log Insight (vRLI) with vROps. The connection tests successfully and alert integration works, however launch in context returns the error “Registration failed: Log Insight Adapter Object Missing”

After a discussion with GSS it was discovered this is actually a known issue due to the vROps cluster being behind a load balancer and the following errors are shown in the Log Insight log /storage/var/loginsight/vcenter_operations.log

[2018-05-15 09:51:02.621+0000] ["https-jsse-nio-443-exec-3"/10.205.73.139 INFO] [com.vmware.loginsight.vcopssuite.VcopsSuiteApiRequest] [Open connection to URL https://vrops.domain.com/suite-api/api/versions/current]
[2018-05-15 09:51:02.621+0000] ["https-jsse-nio-443-exec-3"/10.205.73.139 INFO] [com.vmware.loginsight.vcopssuite.VcopsSuiteApiRequest] [http connection, setting request method 'GET' and content type 'application/json; charset=utf-8']
[2018-05-15 09:51:02.621+0000] ["https-jsse-nio-443-exec-3"/10.205.73.139 INFO] [com.vmware.loginsight.vcopssuite.VcopsSuiteApiRequest] [reading server response]
[2018-05-15 09:51:02.626+0000] ["https-jsse-nio-443-exec-3"/10.205.73.139 ERROR] [com.vmware.loginsight.vcopssuite.VcopsSuiteApiRequest] [failed to post resource to vRealize Operations Manager]
javax.net.ssl.SSLProtocolException: handshake alert:  unrecognized_name

This is caused by some security updates to the Apache Struts, JRE, kernel-default, and other libraries from vRealize Log Insight 4.5.1. These updated libraries affect the SSL Handshake that takes place when testing the vRealize Operations Manager integration.

To resolve this issue we needed to add the FQDN of the vROps load balancer as an alias to the apache2 config. This can be done by following these steps.

  1. ​Log into the vRealize Operations Manager Master node as root via SSH or Console.
  2. Open /usr/lib/vmware-vcopssuite/utilities/conf/vcops-apache.conf in a text editor.
  3. Find the ServerName ${VCOPS_APACHE_SERVER_NAME} line and insert a new line after it.
  4. On the new line enter the following:
ServerAlias vrops.domain.com

Note: Replace vrops.domain.com with the FQDN of vRealize Operations Manager’s load balancer.

5. Save and close the file.

6. Restart the apache2 service:

service apache2 restart

7. Repeat steps 1-6 on all nodes in the vRealize Operations Manager cluster.

vRealize Log Insight 4.8 has been released

Image result for log insight logo

After months of waiting vRealize Log Insight 4.8 (vRLI 4.8) was released last night.

I’ve been waiting on this release as it fixes a number of minor CVEs (Java of course) and the major improvement which has been ask for by almost every customer who I’ve spoken to – Data retention configuration options based on time!

You now have the option to configure the data retention period based on your needs from a few days to 12 months instead of having to exactly size the appliances to guestimate your retention needs.

Another major additions is that there is now a JSON parser so that JSON logs can be easily sent and parsed into vRLI. Additionally the parser can be configured for conditional parsing. Users can specify if a parser should be applied based on the value of a parsed field.

There have been a number of minor security improvements including one which could delay upgrade for those with older SSL certificates. From 4.8, the minimum key size for the virtual appliance certificate must be 2048 bits or greater.

There are a couple of resolved issues which have bugged me (and clients) in the previous releases

  • Launch in context for vROps is now working correctly.
  • Queries now support time-related terms that when entered are automatically translated to the current time.
  • The “From” date bug is fixed

VMware are yet to update the Interoperability Matrix but hopefully there won’t be any major surprises in store.

So all in all, more minor evolution than revolution. as many were expecting the next release of vRLI to herald the change to PhotonOS like many other VMware appliances, but it is welcome all the same.

The download is already available on my.vmware.com, and as per usual you must be running vRealize Log Insight 4.7 or 4.7.1 to upgrade to 4.8. Follow my guide HERE for upgrading Log Insight.

The full release notes can be found HERE

VMware Certified Advanced Professional 7 – Desktop and Mobility Design exam (VCAP7-DTM Design)

After almost a decade of working with VMware’s EUC offerings I have finally found time to sit (and pass) a VCAP7-DTM Design after a lot of badgering from VMware.

The exam itself is very similar to other VMware multiple choice exams such as all the VCPs. However for the VCAP they now have some drag and drop questions for matching a statement to a definition.

Unfortunately for those who are new to the Horizon Suite or completing client design meetings, I can’t say it will be easy. Many of the questions revolve around architecture design and requirement’s gathering, so having an understanding of VMware’s best practice design methodology is a must.

Luckily VMware have produced a blueprint for the exam which identifies the areas which are covered so that you know the product sets to focus on. It’s important to note the product versions which are required as the exam does not use the latest versions and this will affect sizing estimates and feature availability. If it’s not in the blueprint, it’s not required, so don’t go focusing too much on the technical details of NSX for Desktops for example, but do have an understanding of the sizing limits of Horizon and vSphere.

The blueprint can be found HERE

The appendix of the blueprint lists 115 references which I would highly recommend reading before the exam. Helpfully someone has bundled these all together in a single zip file to save us having to sort through all this ourselves. So a massive thank you to Kyran Brophy for doing this.

Download the bundle HERE (64MB).

Kyran has also broken down the blueprint to complete a VCAP7-DTM Design Study Guide, and I can highly recommend reading through it to make sure you have an understanding of the requirements. His Study Guide’s start page can be found HERE

The cost for VCAP exams is now quite significant ($450) so unless you’re lucky enough to have a free exam at VMworld or EMPower, I would recommend a few weeks dedicated study time before the exam for running through the reference architectures and the aforementioned references and study guide.

Good luck.

Removing a Management Pack from vRealize Operations Manager (vROps)

I was recently asked by a colleague new to vROps, on how to remove a management pack in their client’s environment and realised it’s not really well documented and used to be a GSS only process.

Unfortunately removing a management pack from vROps is a CLI operation.

1. Log in to the vRealize Operations Manager Master node as root through SSH or Console.

2. Run this command to determine the existing management pack .pak files and make note of the name of the solution you want to remove:

$VMWARE_PYTHON_BIN $ALIVE_BASE/../vmware-vcopssuite/utilities/pakManager/bin/vcopsPakManager.py --action query_pak_files

3. Run this command to determine the management pack’s internal adapter name listed in the name section:

cat /storage/db/pakRepoLocal/<Adapter_Folder>/manifest.txt

4. Change to the /usr/lib/vmware-vcops/tools/opscli/ directory.

5. Run the ops-cli.sh script with the uninstall option for the management pack name

./ops-cli.sh solution uninstall "<adapter_name>"

6. Run the cleanup script:

$VMWARE_PYTHON_BIN $ALIVE_BASE/../vmware-vcopssuite/utilities/pakManager/bin/vcopsPakManager.py --action cleanup --remove_pak --pak "<adapter_name>"

7. Remove the management pack’s .pak file from the $STORAGE/db/casa/pak/dist_pak_files/VA_LINUX/ directory.

8. Open the vcopsPakManagerCommonHistory.json file using a text editor.

vi /storage/db/pakRepoLocal/vcopsPakManagerCommonHistory.json 

9. Delete entries related to the deleted management pack from { to }

10. Save and close the file.

:wq